From your team
Using Totalizr on Windows
Why we're switching
SDA is moving from QBO Time to Totalizr. The goal is simple: get hours captured on time so payroll and client invoices are right and go out on time.
What I need from you:
- Log your time as you go, or at least once a day before you leave.
- Submit your week by Friday end of day.
This guide covers installing the app, signing in, entering time, submitting your week, and using the tray timer.
Open video full screenWatch the walkthrough (video)1. Install the Windows app
-
Go to totalizr.app/download and click Windows · 64-bit installer. It works on Windows 10 and 11, 64-bit.
-
Edge may show a warning that the file "isn't commonly downloaded." That's expected for a new app. The installer is a code-signed
.exe. In the Downloads panel, choose Keep.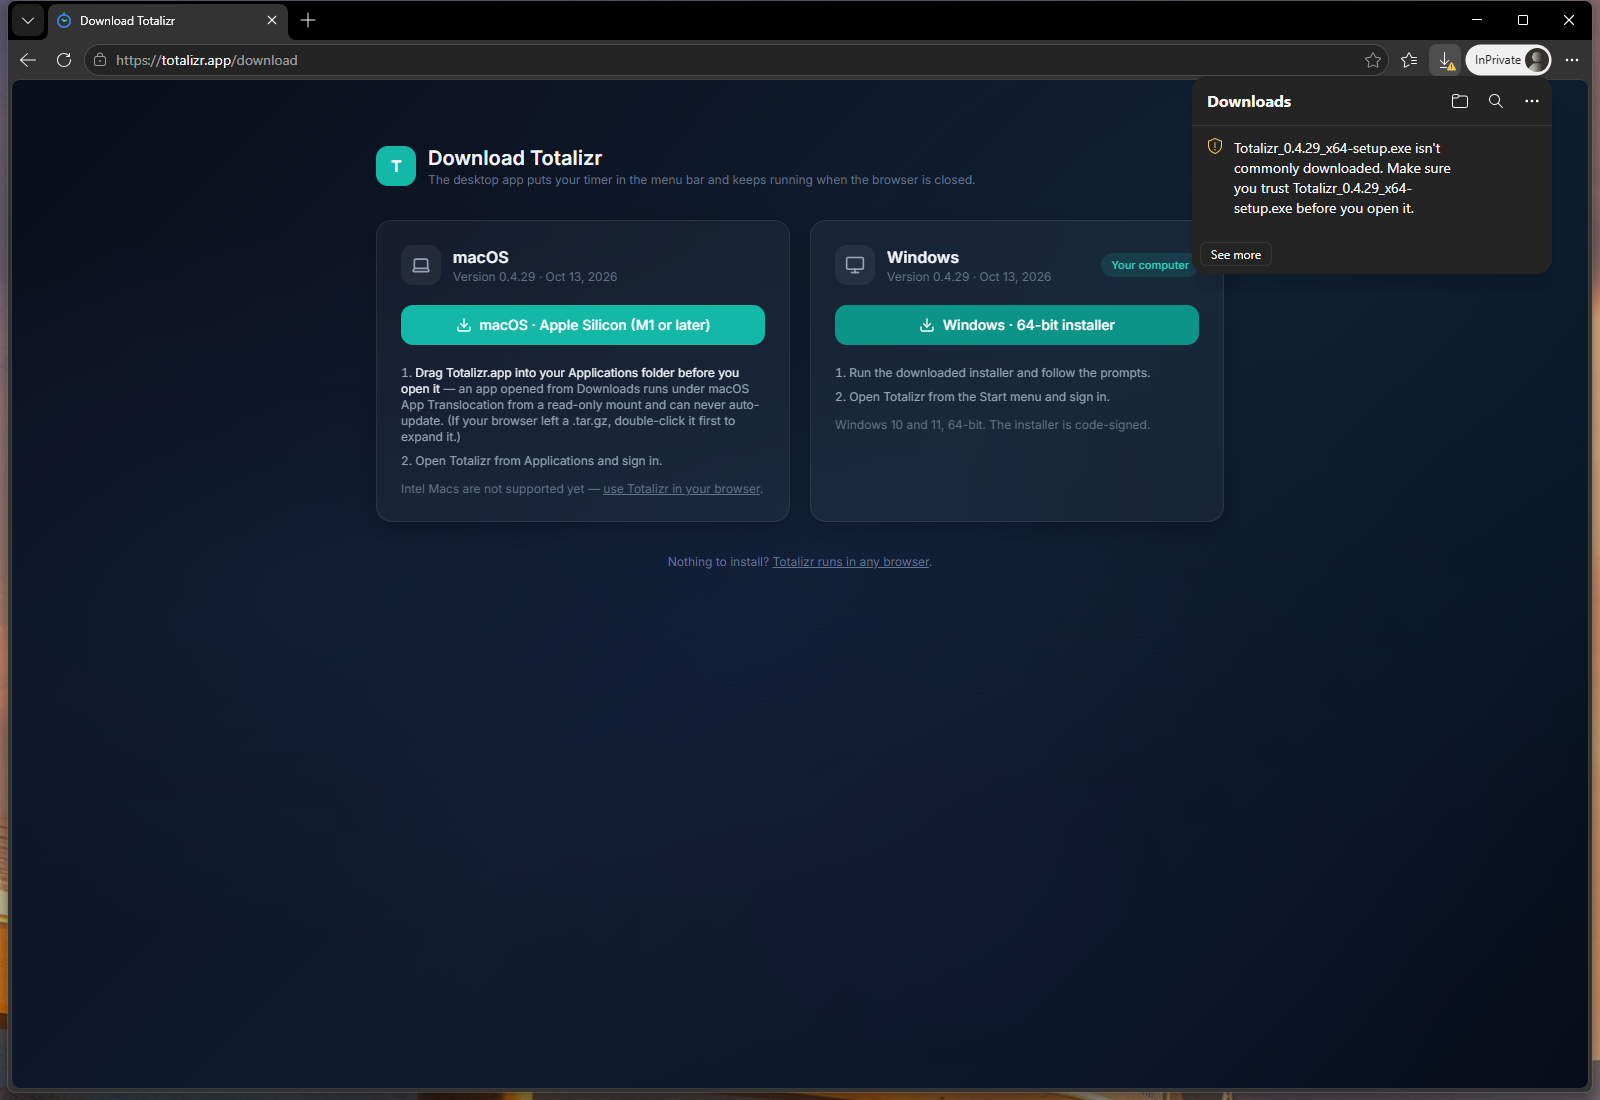
-
Open the downloaded file. Windows will ask for admin permission (a UAC prompt). Click Yes, then follow the installer prompts.
-
Open Totalizr from the Start menu. Search for Totalizr and click it.
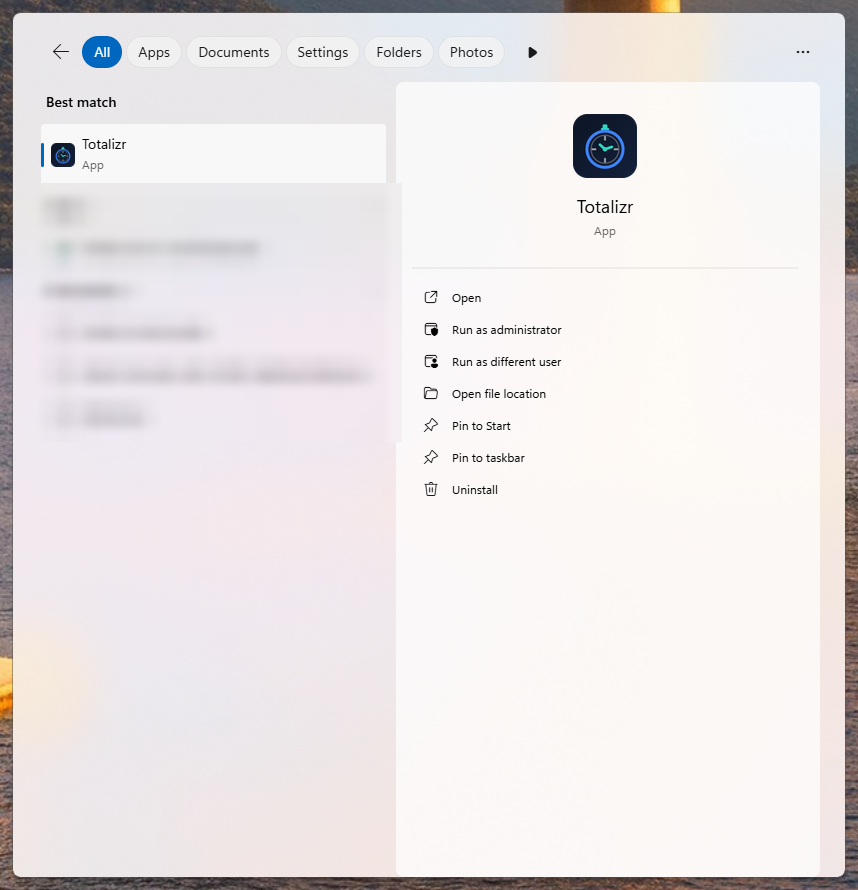
A Totalizr icon also shows up in the system tray. More on that in section 5.
2. Sign in
An admin adds you to Totalizr first. Once you're added, you just sign in.
-
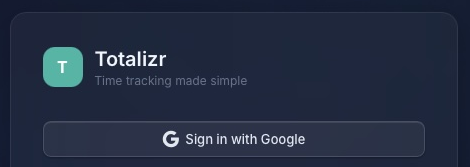
Click Sign in with Google.
-
Pick your SDA Google account. Sign-in finishes in your browser and returns you to the app.
3. Enter time (Day view)
-
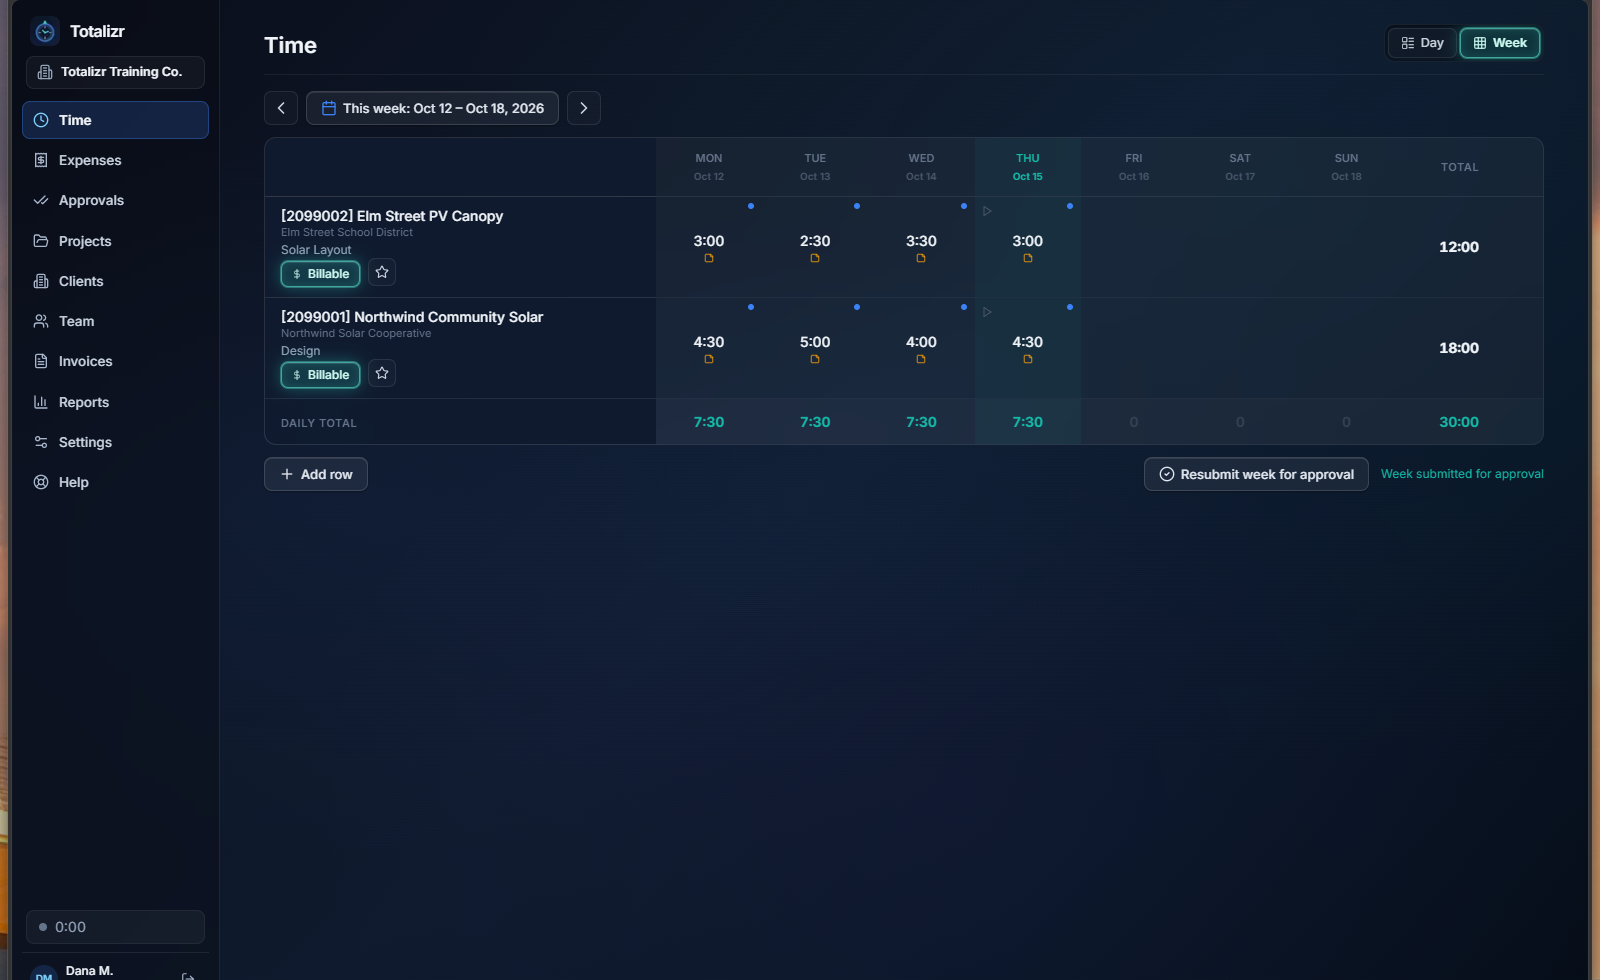
Click Time in the left sidebar.
-
Click Day. Use Previous day and Next day to get to the day you want.
-
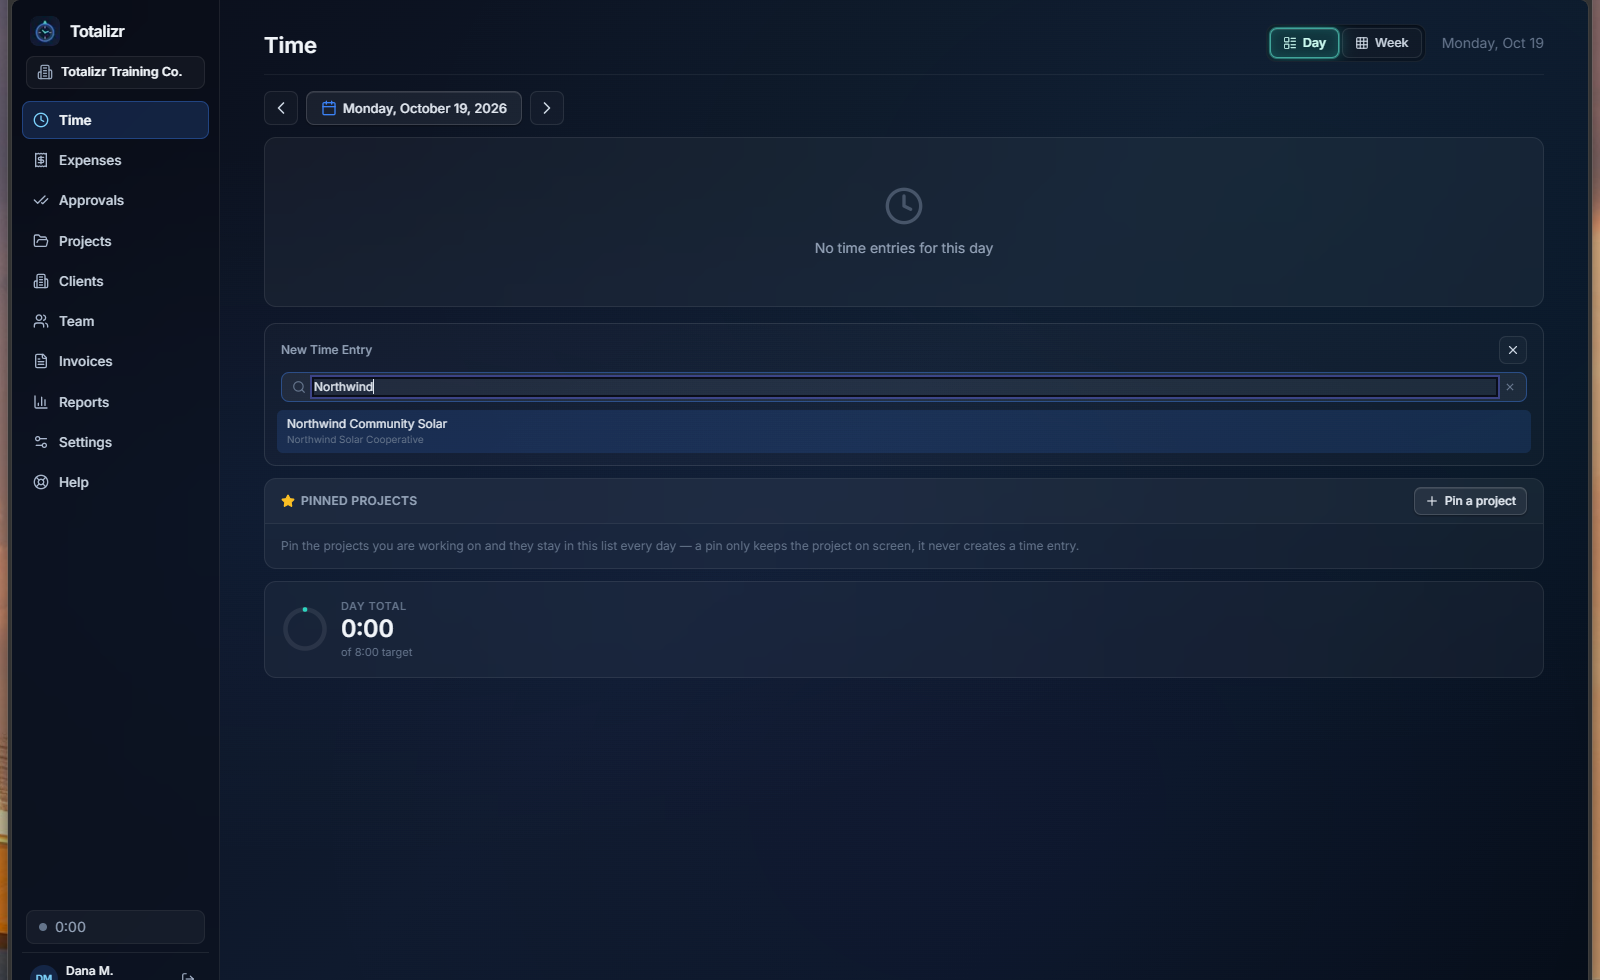
Click New entry. In Search projects... type part of the project name and pick it. Then click the task.
-
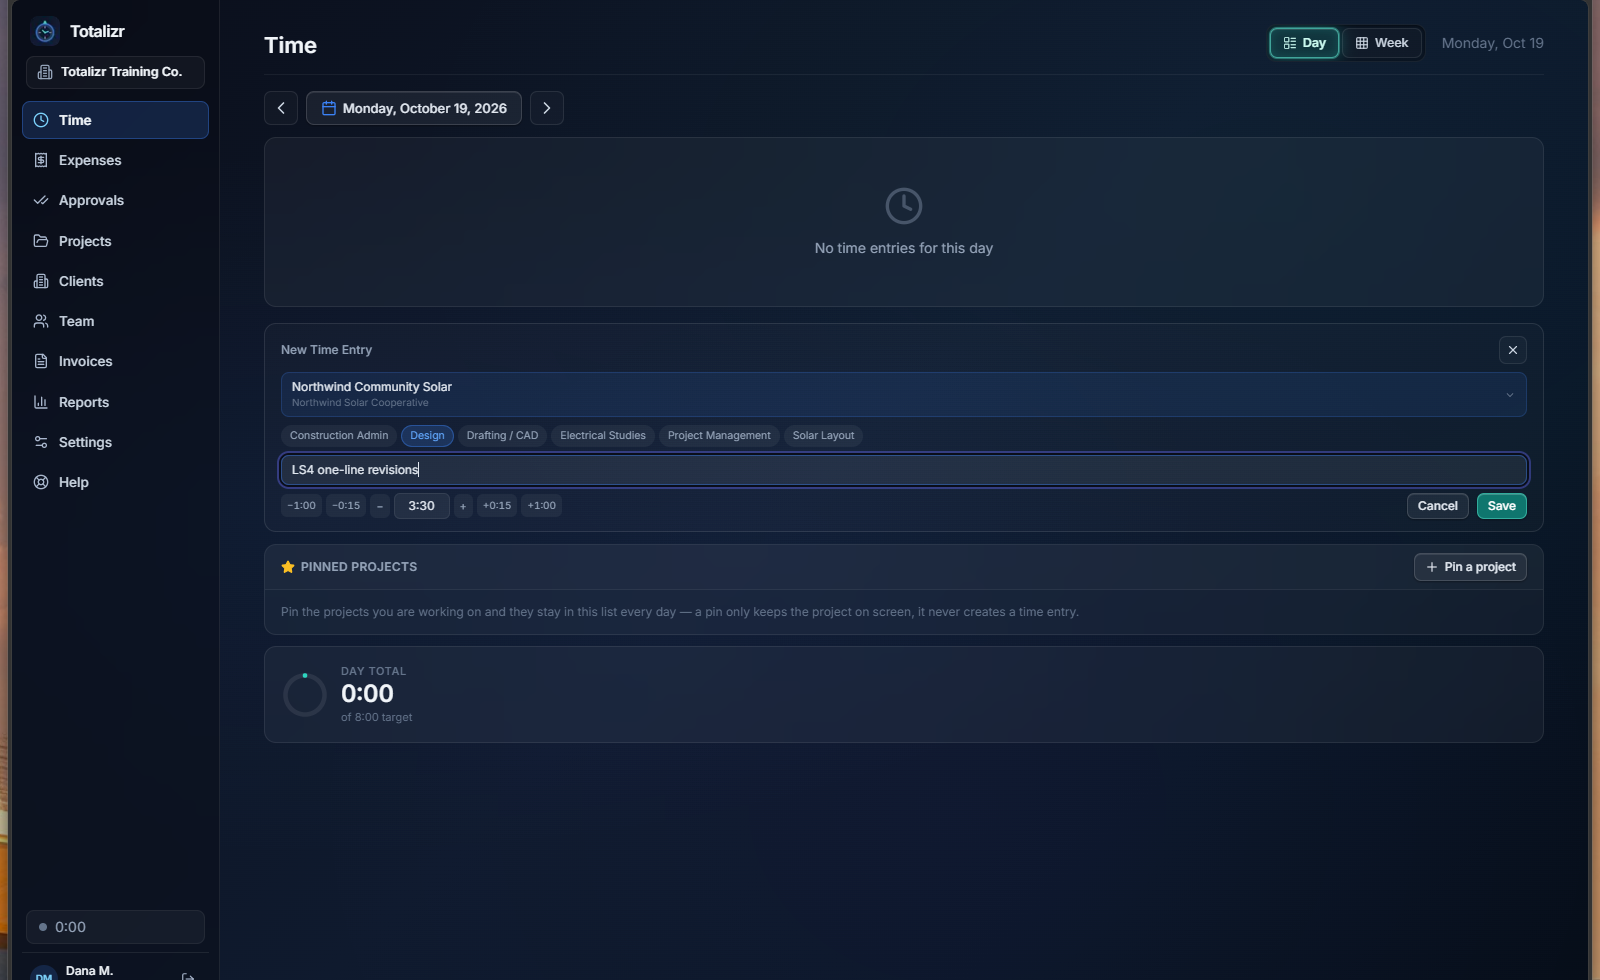
Type your hours in the 0:00 box (for example
3:30). Add a note in Notes (optional). You can nudge the time with -1:00, -0:15, +0:15, +1:00. -
Click Save.
Tip: on today's date, if you leave hours blank, the button reads Start and starts a timer instead.
To fix a row, click Change project or task, make your change, and click Save (or Cancel edit). Use Delete entry to remove it.
4. Week view and submitting
-
Click Week. Use Previous week and Next week to move around.
-
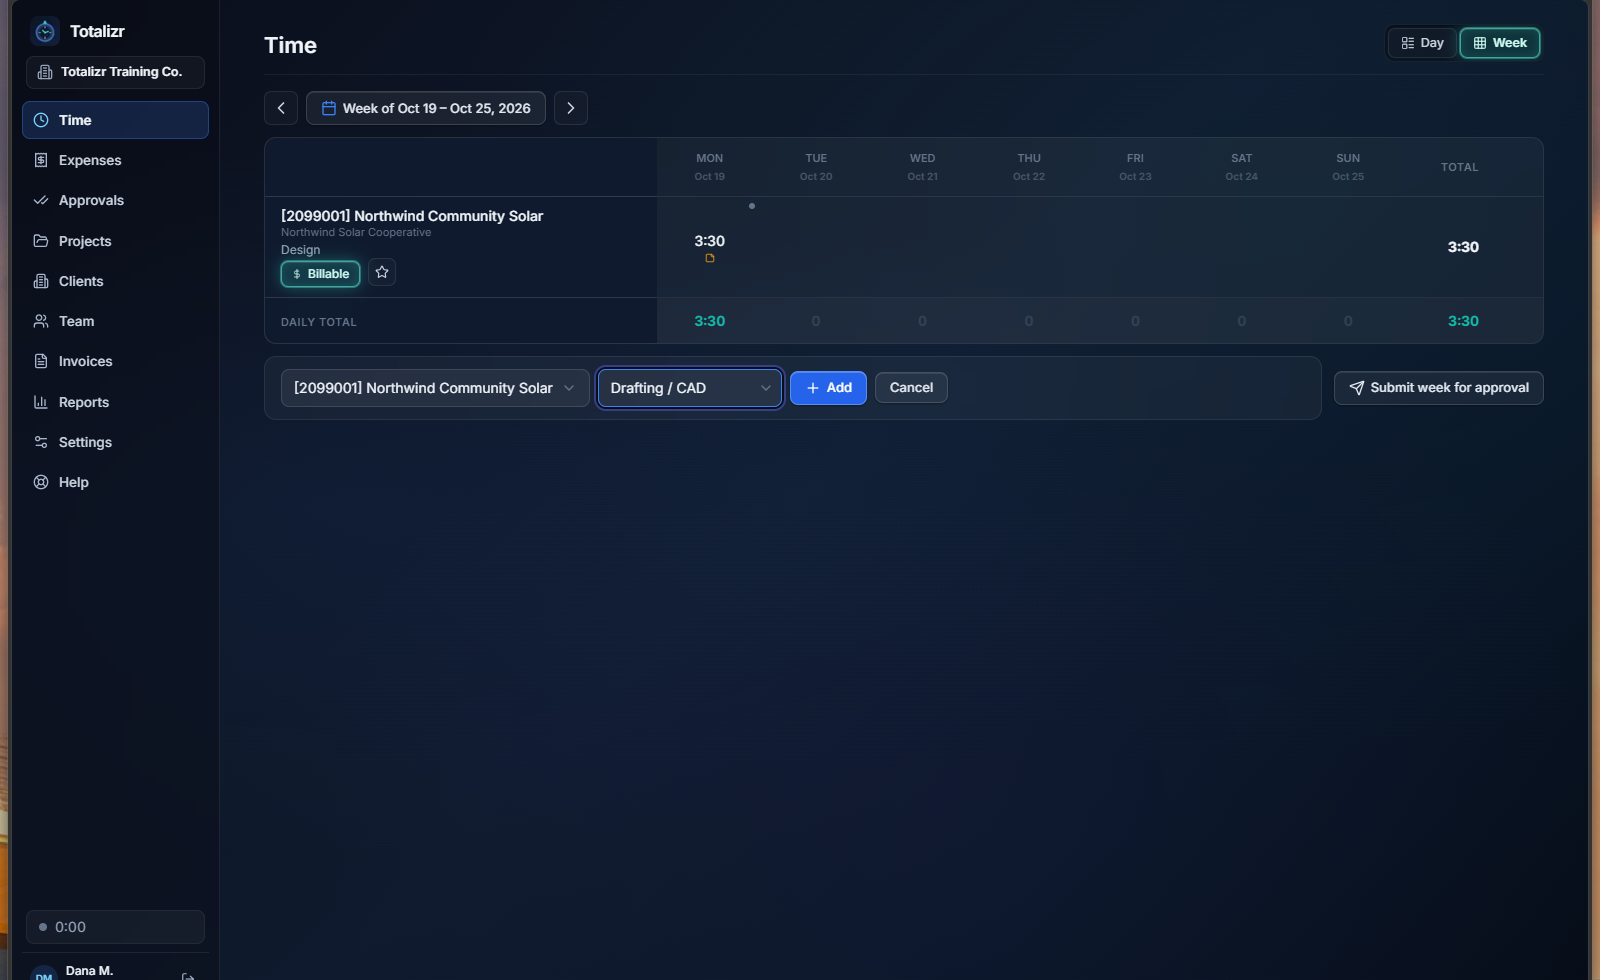
To add a project, click Add row, choose from Select project..., pick the task under Select a task., then click Add.
-
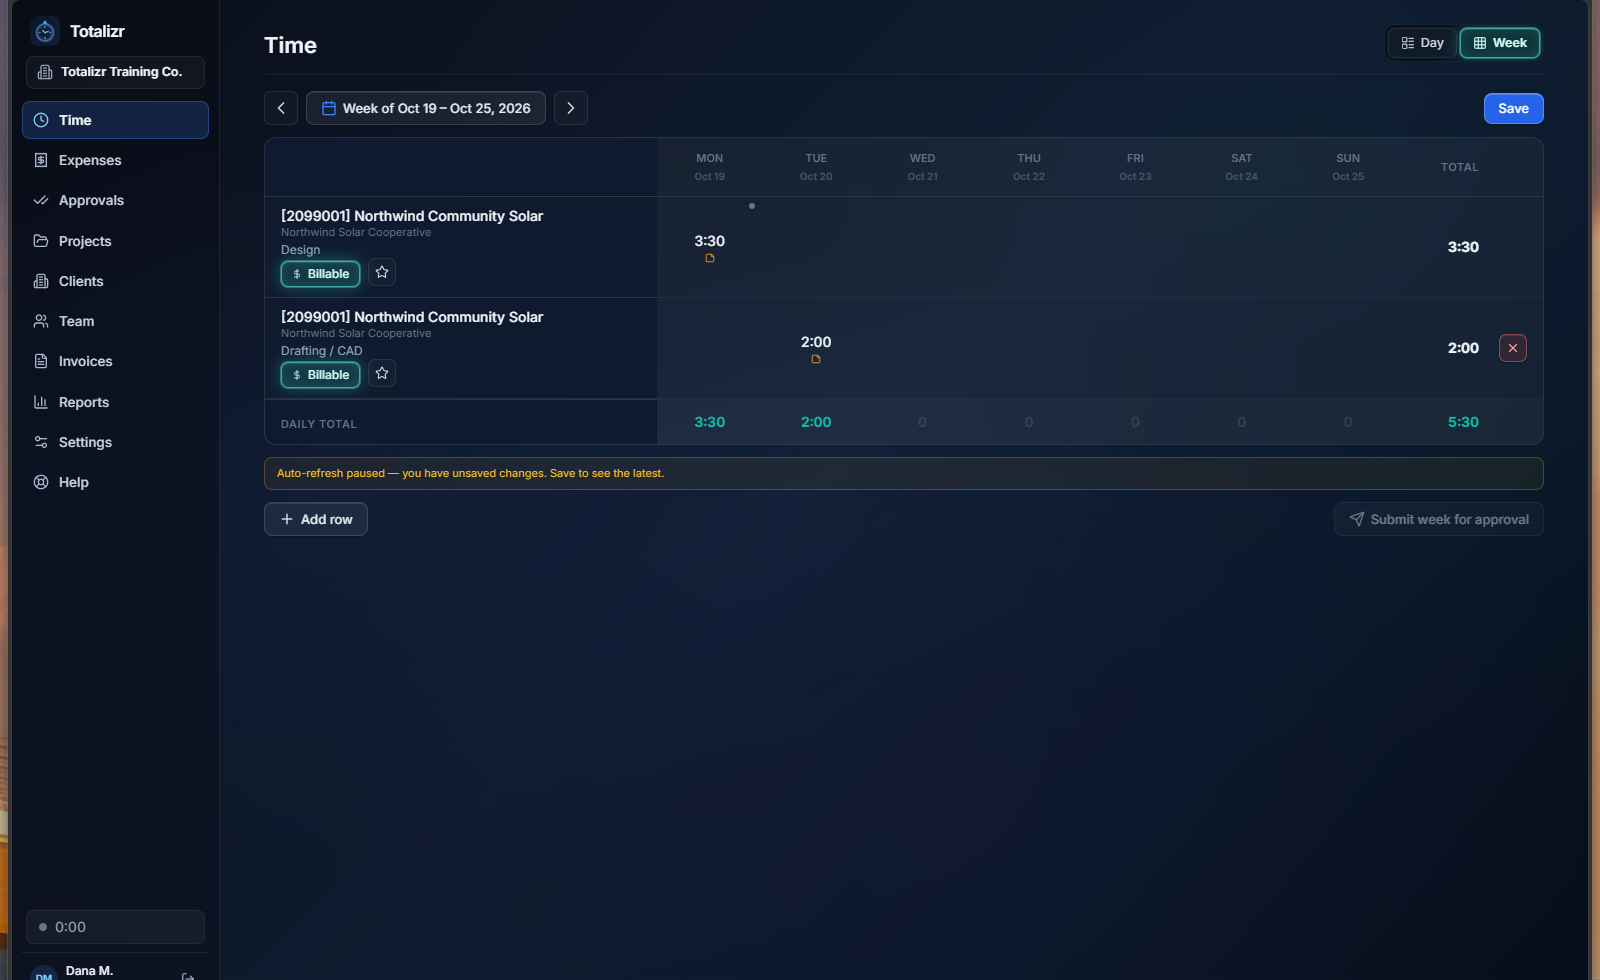
Type hours in the day cells. Use Add a note… for the note.
-
Click Save above the grid. The week grid does not save on its own. Until you save, you'll see "Auto-refresh paused - you have unsaved changes."
-
When your week is done, click Submit week for approval. You'll see Week submitted for approval and the cells show Submitted.
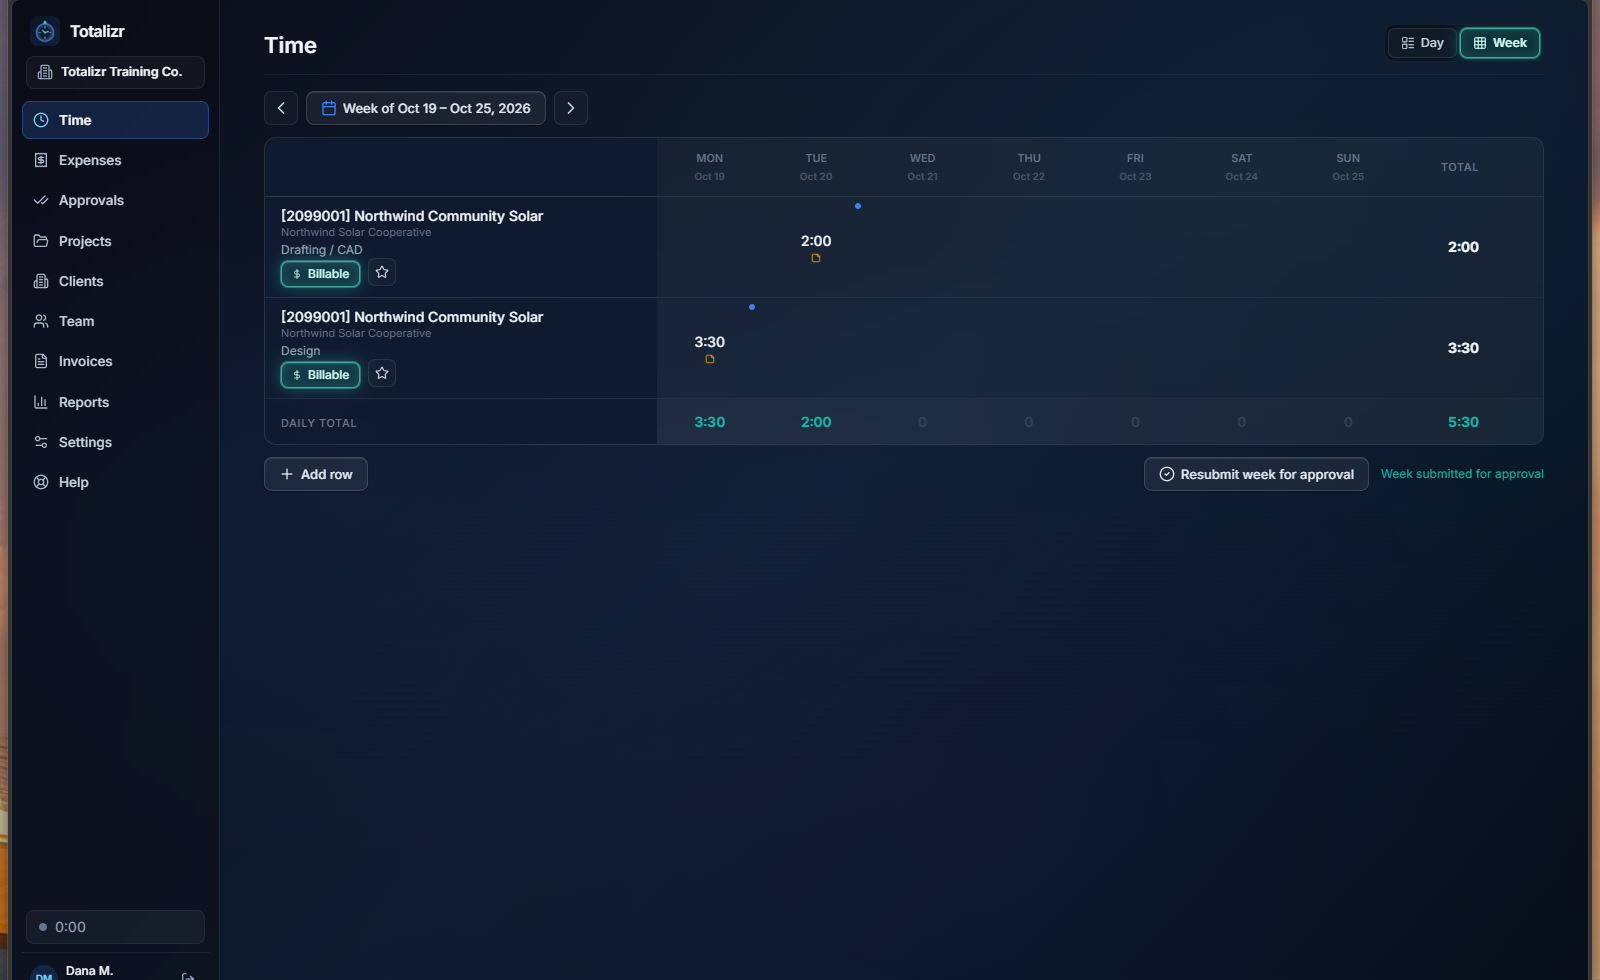
If your PM rejects an entry, you'll see Rejected with the reason. Fix it, click Save, then click Resubmit week for approval. Once it's approved, your week shows Week approved.
For project managers: approvals
-
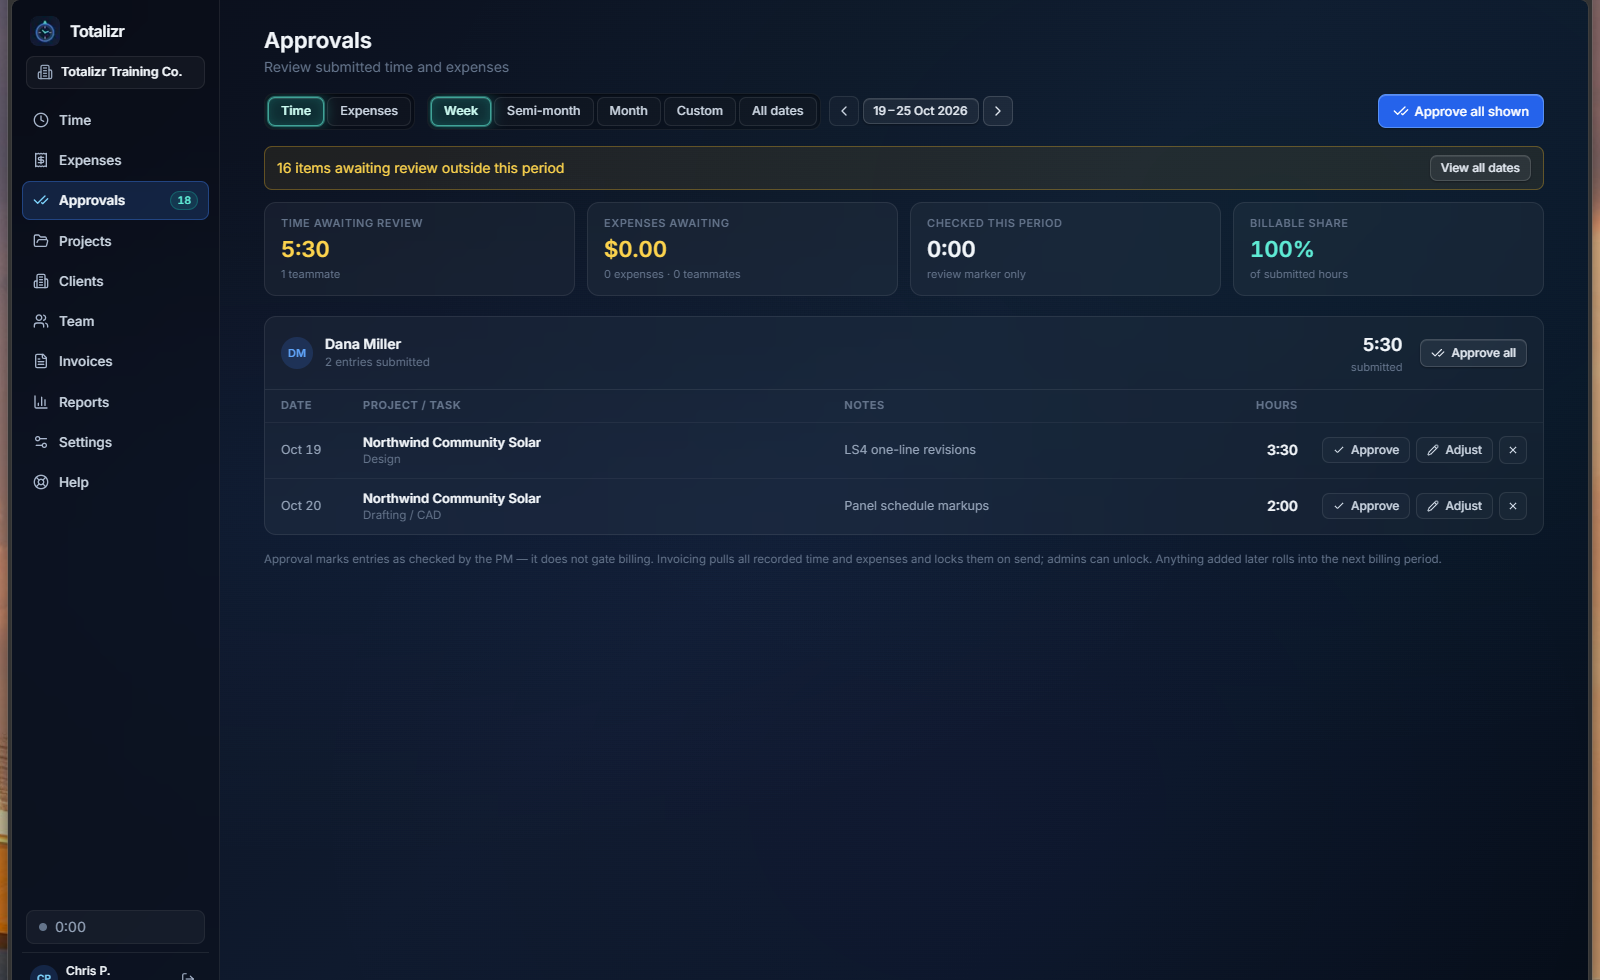
Click Approvals in the sidebar. The badge shows how many are waiting.
-
Pick Time, then a range (Week, Semi-month, Month, Custom, or All dates).
-
Click Approve on a line, or Approve all shown. Approved lines show Checked.
-
To send something back, click the X (Reject), type a reason, and click Reject. The reason goes to the person who submitted it.
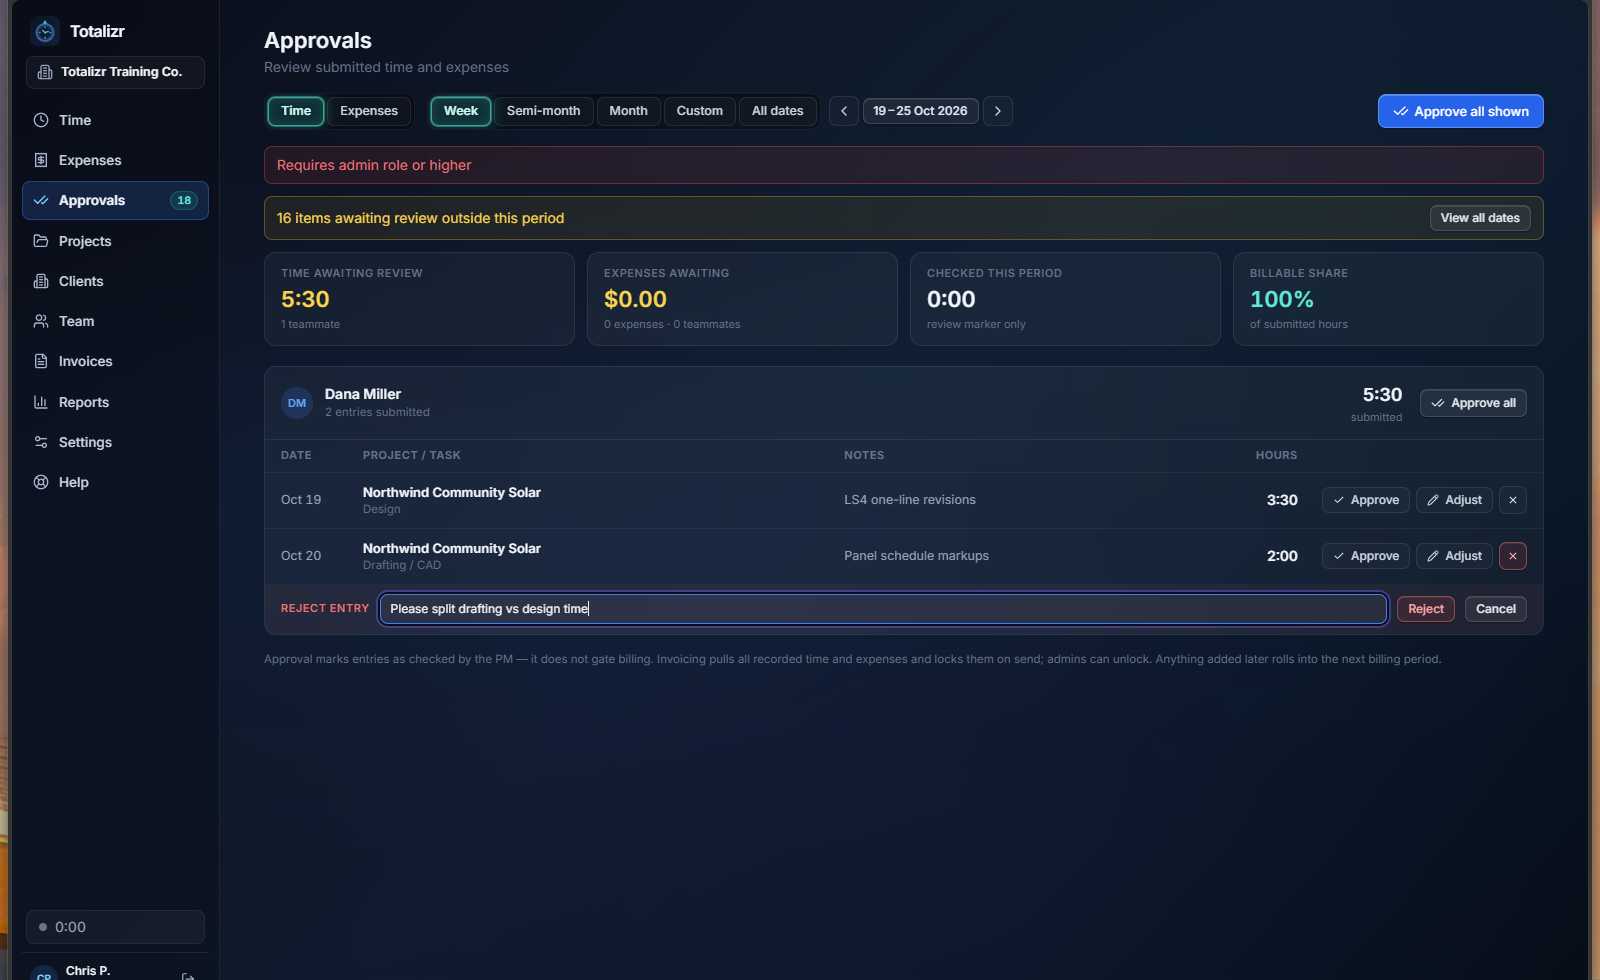
Only Admins and Owners can Adjust hours. PMs should reject with a reason instead.
5. The tray timer (popover)
Totalizr also lives in the system tray, the lower right of your taskbar next to the clock. From there you can log time without opening the full app.
Find the icon
-
Look in the lower right of the taskbar.
-
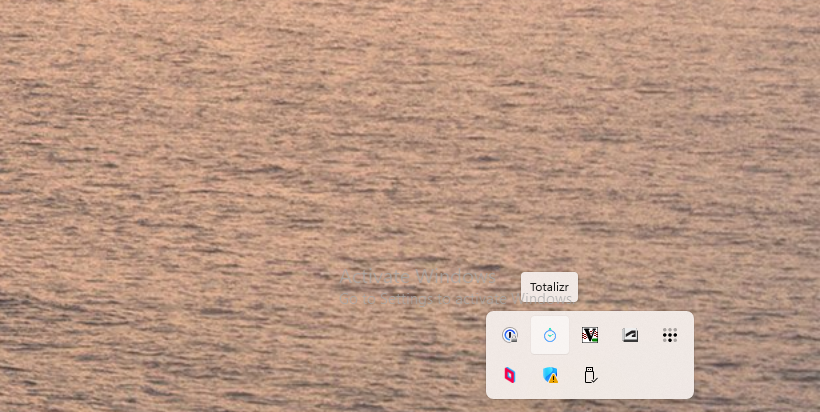
If you don't see it, click the small ^ arrow (Show hidden icons). The Totalizr icon is in that pop-up. Hover over it and it says Totalizr.
-
To keep it visible, drag the icon from the ^ pop-up down onto the taskbar next to the clock.
Open the popover
Left-click the icon. The Totalizr Timer window opens above the tray.
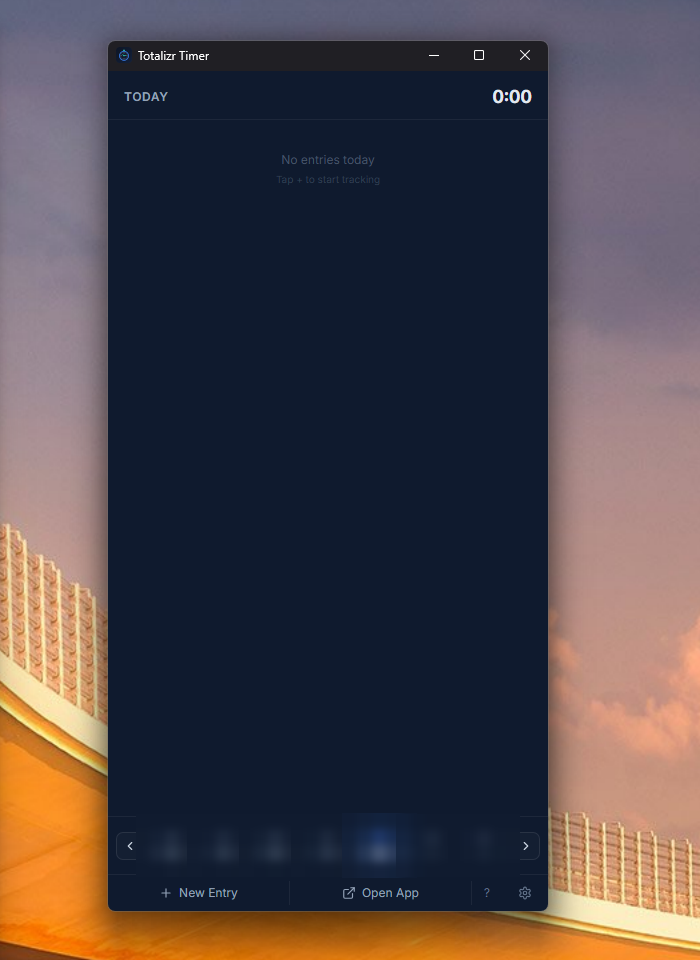
What each part does:
- TODAY and total (top): your hours logged today. Shows "No entries today" when empty.
- Day strip with < and >: move to the previous or next day.
- + New Entry: add a time entry, or start a timer.
- Open App: opens the full Totalizr window.
- ? (Help): help.
- Gear (Settings): a menu with Open Totalizr, Preferences..., Quit Totalizr.
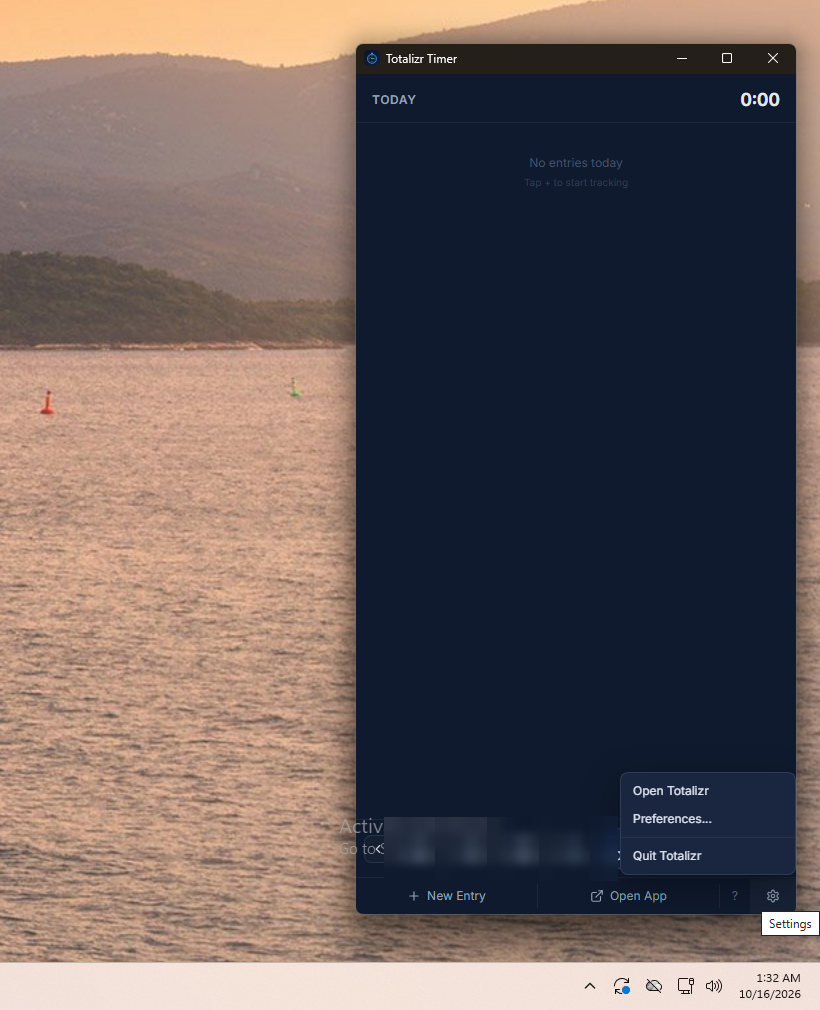
Enter time in the popover
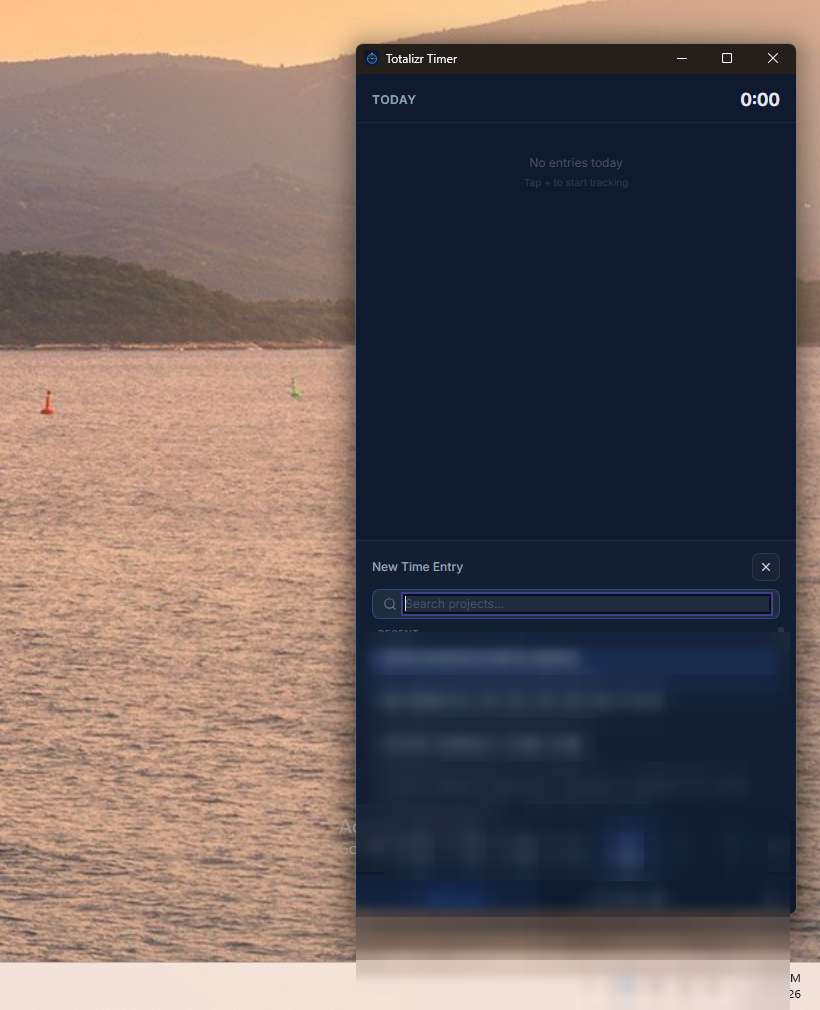
- Click New Entry.
- In New Time Entry, use Search projects... to pick your project, then the task. Recent projects show under RECENT.
- Type hours, or leave hours blank to start a timer. Add Notes (optional).
- Save the entry.
On a row, use Start timer and Stop timer to track time live.
You can't submit from the popover. Click Open App and submit your week from the Week view.
Move it where you want
The popover is a normal window. Drag it by the Totalizr Timer title bar and put it anywhere, like next to your drawing. You can resize it from the edges. It doesn't stay on top of other windows. It remembers where you put it until you quit Totalizr. After a restart it opens back at the lower right.
Right-click menu
Right-click the tray icon for a quick menu. With no timer running it shows:
- Start timer…
- No timer running (greyed out)
- Totalizr version (greyed out)
- Check for updates…
- Open Totalizr
- Quit Totalizr
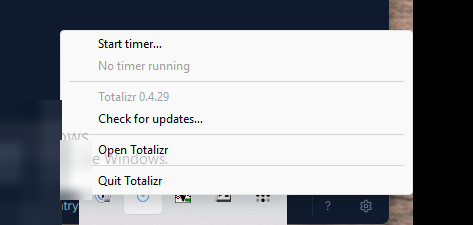
While a timer runs, the top item becomes Stop with the running time, and the project name shows below it.
Need help?
Click Help in the Totalizr sidebar to come back to this guide. If you still need a hand, ask your admin.
Thanks for logging time as you go. Submit by Friday end of day.
-Will
Totalizr user guide
Totalizr is where you record your time and expenses, and where your company turns that work into invoices. This guide covers the everyday tasks first, then the work admins and bookkeepers do. What you can see and change depends on your role.
Contents
- Getting started
- Time
- Approvals
- Planned time off
- Expenses and receipts
- Clients and projects
- Estimates
- Invoices
- Payments and deposits
- QuickBooks
- Reports
- Team
- Settings
- The desktop app
- If something looks wrong
Getting started
Signing in
Access to Totalizr is by invitation. You can't create your own account; ask your admin for an invite.
To sign in with your email and password:
- Open the sign-in page.
- Enter your Email and Password.
- Select Sign In.
If your company uses Google sign-in, the page shows a Sign in with Google button instead. Select it and choose your work account. To use a password, select Sign in with email and password instead.
Google sign-in only works for an email address your company has already invited. If you see "No Totalizr account matches that email", ask your admin to invite that address.
Your invitation
Your invite email is good for 7 days. A newer invite cancels older ones.
- If the email has a Set your password button, select it, choose a password of at least 8 characters, and then sign in.
- If your company uses Google sign-in, the email has a Sign in with Google button. If you'd rather use a password, use the link in the email to set one.
If the link has expired, ask your admin to send a new invite.
A temporary password from your admin
If your admin gave you a password, it is temporary. When you sign in with it, Totalizr emails you a 6-digit code and asks you to Choose your own password. Enter the code from the email, then a new password of at least 8 characters twice, and select Save and continue. The temporary password stops working.
The code works once, for 15 minutes. If it doesn't arrive or has expired, select Resend code: the new code replaces the old one. After five wrong codes, sign in again for a new one. After 10 wrong codes in a day, the temporary password stops working, even if your admin sets a new one: use Forgot password to choose your own, or try again the next day.
If another company adds you before you've chosen your own, the temporary password is cleared and you get an email with a link to choose one.
Forgot your password
- On the sign-in page, select Forgot password?.
- Enter your email and select Send reset link.
- Open the email and select Reset password.
- Enter your new password twice and select Set password.
The reset link works for 1 hour. If no email arrives, wait 5 minutes before you ask again; Totalizr sends at most one reset email every 5 minutes. A new password works for every company you belong to, and it signs you out on your other devices.
Choosing a company
If your email belongs to more than one company, Totalizr asks you to Choose an account when you sign in. Pick the company you want to work in.
To switch companies later:
- Select the company name under the Totalizr logo, or open your profile menu and choose Switch account.
- Pick the other company.
The page reloads in that company. Each company has its own projects, time and invoices.
Finding your way around
On a wide screen, the menu is on the left: Time, Expenses, Approvals, Projects, Clients, Team, Invoices, Estimates, Reports, Settings and Help. In a narrower window the same menu runs across the top. You see only the pages your role can use: Approvals is for managers, admins and owners, and Invoices, Estimates and Reports are for managers, admins, owners and bookkeepers. See Roles.
On a phone, tabs along the bottom open Time, Expenses, Reports (if your role has it) and Settings. The Settings tab opens a sheet with the other pages your role can use (Approvals, Projects, Clients, Team, Invoices, Estimates and Help), then All settings and Sign out.
A number next to Approvals counts the time entries waiting for your review.
Select your initials at the bottom of the left menu to open your profile menu. It has the theme switch, Seasonal effects, My hours, Switch account, Get the desktop app (Check for updates in the desktop app) and Sign out. The version number under your name is useful when you report a problem.
What you can change depends on your role. See Roles.
Light and dark theme
Choose System, Light or Dark in your profile menu, or in Settings → Preferences → Appearance. The theme is just for you, on that device.
Seasonal effects
Seasonal effects draws light falling particles over the app's pages. It is off unless you turn it on, and it's just for you. Your choice is saved to your account in each company you belong to, so it follows you to every computer, browser and the desktop app. Choose it in your profile menu, under the theme switch, or in Settings → Preferences → Appearance:
- Off: no effect. This is where it starts.
- By season: petals from March to May; in summer, June to August, fireflies and a forest and lake at the foot of the left menu; falling leaves from September to November; and snow from December to February, going by your computer's date. If it's raining or snowing at your company's office, you see rain or snow instead. The office is the address in Settings → Company. For an office in the US, it uses the reports from the two nearest US weather stations, from the National Weather Service: rain or snow if either reported it in the last hour, and dry only when both have reported recently and neither saw any. When the stations can't say, it uses MET Norway's forecast for the hour; elsewhere it uses MET Norway's forecast. The weather is checked again about every half hour while the page is open. The choice says what is showing, for example By season (leaves now). While it's using the weather, a credit line shows under it naming where the weather came from: "Weather: National Weather Service (NOAA)" for the stations' reports, or "Weather: Data from MET Norway" for the forecast. The line adds "Location © OpenStreetMap contributors" when the office was found through OpenStreetMap, by its city or by a postal code outside the US.
- Pink sparkles, Falling leaves, Snow, Rain, Petals or Summer lake: that effect, all year, whatever the weather. Summer lake is the fireflies with the forest and lake.
The forest and lake sit in the empty space of the left menu, so they only appear where that menu is, on wider screens.
While an effect is on, Let it pile up lets snow, leaves and petals build up along the top edges of cards, buttons, text boxes and tabs, and deepest along the bottom of the window. The longer it falls, the deeper it gets: over a few minutes, up to about 10 px on cards and buttons and about 40 px at the bottom of the window. Where something sits close above an edge, such as a field's label, the pile stops short of it, so it never covers text. Once nothing has landed on a stretch for a while (for example, after you scroll it out of view), it melts away over a few minutes. Rain doesn't pile up: it splashes where it lands, drips off the bottom edges of the cards and buttons it falls on, and gathers in a shallow puddle along the bottom of the window. Sparkles and fireflies alight and twinkle where they land. It starts ticked. Untick it to clear everything at once. When the effect changes, whether you choose a different one or By season changes with the weather, what has piled up isn't swept away: snow melts, puddles dry and leaves and petals settle and fade over a few minutes while the new effect falls. Turning effects off, or going to a page without them, clears it at once.
The effects never get in the way: clicks go through them, and dialogs and menus stay on top. If your computer is set to reduce motion, nothing falls and the summer forest and lake stay still, and the Seasonal effects setting says it is paused. To let them move: on Windows 11, turn on Settings → Accessibility → Visual effects → Animation effects; on Windows 10, turn on Settings → Ease of Access → Display → Show animations in Windows (on either, a Remote Desktop session can turn animations off); on a Mac, turn off System Settings → Accessibility → Display → Reduce motion. The office weather isn't checked then either, so By season goes by the date alone: in summer you see the still lake even if it's raining at the office. Effects aren't printed, and they don't appear on the help page or in the desktop app's timer window.
Owners and admins can also choose an effect for someone else, as a surprise: in Team, open the person and pick one under Seasonal effects. It shows the next time they open Totalizr, and they can change it whenever they like.
Owners and admins can turn seasonal effects off for everyone in the company: in Settings → Preferences → Seasonal effects for everyone, tick Turn seasonal effects off for everyone. Everyone's own choice is kept, and comes back when the box is unticked. While it's ticked, the choice in your profile menu says Turned off for everyone by your company's owner or admin.
Read-only mode
If a banner says "Read-only — license expired", you can still open and read everything, but you can't make changes until your company renews its subscription.
Time
The Time page is where you record your hours. It opens in week view.
Day and week views
Use the Day and Week switch at the top of the page.
- Week shows Monday to Sunday. Each row is a project and task, with a Total column on the right and a Daily Total row at the bottom. Use the arrows to move between weeks, or select the week label to open a calendar: select any day to show its week, or This week to come back.
- Day lists one day's entries, one per row, with a Day total. Use the arrows to move between days, or select the date to open a calendar: select a day to show it, or Today to come back. In the calendar, the arrow keys move between days, Enter picks one and Escape closes it.
Managers, admins and owners can also choose whose time to see: My time, All people (day view only), or one person. The PTO balance and the My hours link at the top of the page then follow that person.
Adding time in day view
To add time for one day:
- Go to the day and select New entry.
- Search for the project. Projects you used recently are listed first.
- Pick a task. If the project has tasks, you must pick one.
- Add a note. If your company requires notes, the box says Note (required), and Save and Start wait until you write one.
- Type the time, then select Save.
You can type time as hours and minutes (1:30) or as a decimal (1.5). Both mean an hour and a half. In day view, a whole number over 24 is read as minutes, so 90 means 1:30. The buttons around the time box add or take away 15 minutes or an hour. One entry can't be more than 24 hours.
Adding time in week view
To fill in a week:
- Select Add row, choose a project and a task, and select Add.
- Select a day in that row and type the hours (1:30 or 1.5). A note box opens under the cell, and grows as you write. If your company requires notes, hours need a note: the cell stays open and asks for one until you write it, and Escape discards the hours instead.
- Press Enter or Tab to move to the next cell. Shift+Tab moves back. Escape cancels the cell you're typing in.
- Select Save.
Your changes aren't kept until you select Save. If you leave the week with unsaved changes, Totalizr asks before it discards them.
In the week grid, a plain number is always hours. Each row also has a Billable / Non-billable switch.
To remove time, type 0 in the cell and save. To remove a row that has no saved time, select Remove row.
Some cells can only be changed in day view: a cell that holds more than one entry, and a cell with a running timer.
Starting and stopping a timer
To start a timer:
- In day view on today, select New entry, pick the project and task, leave the time empty, and select Start.
- To continue an entry from today, select Start timer on that entry.
- In week view, use the start button in today's column. If your company requires notes and today's cell has none, it asks for the note first.
To stop it, select Stop timer on the entry, or the stop button next to the running timer in the menu.
Only one timer runs at a time. Starting a new one stops the one that was running. Timers only run on today; for an earlier day, type the hours instead. An entry that is already on an invoice can't be restarted, so start a new timer.
Notes, editing and deleting
In day view:
- Select an entry's notes or hours to change them. The change saves when you click away or press Enter.
- Select the pencil (Change project or task) to move the entry to another project or task.
- To move an entry to another day, select its calendar button (Move the 2:30 entry to another day) and pick the day. It stays the same entry, with its hours, task and notes, and the page says where it went: select Go to that day to follow it. Locked, billed and running entries can't be moved.
- To delete an entry, select the trash button, then select it again within 3 seconds to confirm.
In week view, a cell holding one entry has the same calendar button in its corner when you point at it. Moving an approved entry to another day sends it back for approval, like any change to its day; see Pending, submitted, approved and rejected.
Only an owner or admin can delete an approved entry. For anyone else the trash button is dimmed, and its tip says why: change the entry instead, and it goes back for approval. In week view, clearing a cell deletes its entry when you save, so the same rule applies: if a cleared cell holds an approved entry, Save writes nothing and names the cell. In the tray and the phone app, Delete works the same way.
Pinned projects
In day view, Pinned projects keeps the projects you're working on in the list every day. Select Pin a project to add one, or select the star on an entry. A pinned project is only a shortcut: it never creates time by itself. Type hours on its row, or start its timer on today. If your company requires notes, each row has a note box too, and the note goes with the hours or the timer.
Printing a timesheet
In week or day view, select Print to print the time on screen. The page shows the person, the week or the day, each entry with its project, task, notes and hours, and a total for each day and for the period. It never shows rates or amounts, so you can hand it to another firm. Save your changes first: until they are saved, Print waits and a printout shows only a note saying so. In the desktop app, Print opens your computer's print dialog. On a Mac that takes version 0.4.31 or later; earlier Mac versions show Open in browser to print instead, which opens the same day or week in your browser.
My hours
My hours shows the hours you logged over a span, and how your PTO balance got to its number. Open it from the menu under your name, or with My hours at the top of the Time page.
- Span: pick Week, Month, Quarter, YTD (the year to date) or Custom (any two dates). Use the arrows to step, and Today to come back.
- The cards add up the span: Total, Billable, Overhead, PTO (or PTO, Vacation and Sick, if your company keeps separate banks) and Holiday. A line under them says how many hours aren't approved yet. Select a card to show only those hours; Clear filter shows them all again.
- PTO available shows each bank's balance as of today, beside the cards. It doesn't depend on the span.
- The heat map shows your hours by project: by day for a span of up to 31 days, by week up to 26 weeks, and by month after that. The darker a cell, the more hours. Select a project's name to show only its hours.
- By day lists every entry with its project, task, notes and hours, and whether it's approved. By project and task adds them up.
- PTO history starts each bank with a card: Allowance, Earned to date, Used, Available, Still to earn by Dec 31, any carryover or adjustment by an admin, and the Borrowing limit. A bar draws the same figures: used, then available, then still to earn, with borrowing in amber. Under the card is every change to the balance, with the balance after it. Plans for time off show under the bar but aren't taken from it; see Planning time off.
The hours here are exact, as logged: invoice rounding never applies. Print prints the page, with lines for your signature and your approver's; PDF, in a browser, makes the same as a file. When the list of entries is too long to show in full, the page says so and leaves out the signature lines: print a shorter span to get a page to sign.
Managers, admins and owners can choose Whose hours at the top to see anyone's My hours. A manager sees the figures in someone else's PTO history, but not the reasons an admin gave for changing it.
Submitting your week for approval
When your week is complete:
- Open the week in week view.
- Select Save if you have unsaved changes. You can't submit until everything is saved.
- Select Submit week for approval.
All your pending and rejected entries in that week are sent for review. The page then shows "Week submitted for approval", and later "Week approved". If you change entries after submitting, select Resubmit week for approval.
Pending, submitted, approved and rejected
Each cell in week view has a colored dot. Point at it to see the status:
- Pending: saved, not submitted yet.
- Submitted: waiting for review.
- Approved: your manager has reviewed it.
- Rejected: your manager asked for a change. The reason appears in the "Rejected — fix these, then resubmit the week" list under the week grid, and on the entry in day view. Fix the entry, then resubmit the week. When you edit a rejected entry it goes back to pending.
Approval is a review mark. It doesn't lock your time: you can still edit submitted and approved entries. Changing an approved entry's day, hours, project, task or billable setting sends it back for approval: it shows as submitted again, and the edit says so before you save. A new note doesn't. A manager, admin or owner who changes an approved entry keeps it approved. An invoice is what locks time; see Locked and billed time. If your company turns on Require timesheet approval, only approved time goes on invoices, and time that isn't approved yet waits for the next invoice.
Locked and billed time
Time is locked once it is on an invoice. An hourly or milestone invoice locks the time on it as soon as the draft is created; a worksheet invoice locks it when the invoice is sent. In day view locked time shows Invoiced · locked and a lock icon, and you can't change its hours or notes or delete it. Select the lock to see why it is locked. Week view doesn't show the lock; a change to locked time is refused when you save.
Locked time can still be submitted for approval and approved. Submitting and approving change only its approval status, never its hours, notes, project, task, rates or invoice, so Submit week for approval sends locked entries with the rest of the week. Locked time can't be rejected or adjusted on the Approvals page, because nobody can change it there; see Approving.
Locked time has to be unlocked before it can be changed. An admin or owner can unlock it: select the lock, then Unlock (admin). Changes to unlocked time go into the next billing run. Deleting a draft invoice, or voiding a sent one, also unlocks its time, except hours received from another firm through Vendor hours, which stay locked.
If your company invoices in QuickBooks, time that a QuickBooks invoice already billed is also locked. Its message says which QuickBooks invoice billed it and through what date. Time billed in QuickBooks can't be unlocked in Totalizr. Time you typed into Totalizr after that QuickBooks invoice was recorded stays editable.
Time imported from QuickBooks can come in locked, with the reason "Imported from QuickBooks". Correct that time in QuickBooks instead: the nightly sync brings the change in, as long as the entry isn't on an invoice and hasn't been billed in QuickBooks. See QuickBooks time sync.
Rounding
Your timesheet always keeps your exact time. If your company turns on rounding, hours are rounded up on invoices and summary reports only. See Preferences.
Approvals
Managers, admins and owners review submitted time and expenses, on any project. A manager's list starts on the projects they manage (see My projects and All projects); admins and owners see every project. Approval marks entries as checked. It doesn't lock them; an invoice does that.
An approved entry can come back to you. When someone who doesn't approve changes its day, hours, project, task or billable setting, it goes back to submitted and waits in your queue again. A new note doesn't send it back, and a change made by a manager, admin or owner keeps it approved. See Pending, submitted, approved and rejected.
When planned time off is on, plans to approve come first, in Time off to approve at the top of the page. See Approving time off.
Whether approval decides what gets billed is a company setting, Require timesheet approval in Settings → Preferences → Workflow. When it's off, invoices and the billing run include time that hasn't been approved yet, and say how much of it there is. When it's on, they leave unapproved time out until it's approved. Expenses are invoiced either way.
Reviewing submitted time and expenses
- Open Approvals.
- Choose Time or Expenses at the top.
- Choose the period to review (see below).
- If you're a manager, choose My projects or All projects (see below).
Submitted work is grouped by person. Each card shows how many entries the person submitted and their total hours, with the date, project and task, notes and hours of each entry. The tiles at the top count the time and expenses awaiting review in the period.
My projects and All projects
My projects are the projects where a manager is ticked as Project manager on the project's Team tab. A manager's list opens on My projects when they manage at least one project, and on All projects when they manage none. Select All projects to see everything waiting in the company. Any manager can approve, reject or undo on any project. The Checked this period tile counts the same projects as the list. Admins and owners always see every project, so they don't get this choice.
Choosing the period
The period picker sets which submitted work you see:
- Week: Monday to Sunday. This is where the page starts.
- Semi-month: the 1st to the 15th, or the 16th to the end of the month.
- Month: the calendar month.
- Custom: any two dates.
- All dates: everything awaiting review.
Use the arrows to step to the previous or next period. Select the date range to come back to the current period.
If submitted work falls outside the period you picked, a banner says how many items are waiting outside it. Select View all dates to see them.
Approving
- To approve one entry, select Approve on its row.
- To approve everything one person submitted, select Approve all on their card.
- To approve everything on the screen, select Approve all shown.
Totalizr asks you to confirm before it approves several entries. Approved entries show Checked.
Admins and owners can also correct a time entry while approving it. Select Adjust, change the hours, type the reason (it's kept in the history), and select Save & approve.
A locked entry, such as one already on an invoice, shows a lock and why it's locked, for example "Invoiced on 3126". It can be approved like any other, but it has no Reject or Adjust: its owner can't change it, and its hours are on the invoice. To change it, an admin unlocks it first; see Locked and billed time. Time typed in Totalizr that a QuickBooks invoice then billed can still be rejected, but not adjusted.
Requesting changes
To send an entry back:
- Select Reject (the X button) on the entry.
- Type the reason. A reason is required.
- Select Reject.
The entry shows Rejected with your reason on the Approvals page. The person sees Rejected and your reason on their own screens: under the week grid and on the entry in day view and the tray for time, and beside the status on the Expenses page for an expense. Totalizr doesn't email it. When they fix it and resubmit, it comes back to your queue, and the reason is cleared.
Rejected it by mistake? Select Undo next to Rejected before you leave the page. The entry goes back to submitted and waits in your queue again.
Undoing an approval
To take back an approval, select Undo next to Checked. The entry goes back to submitted, ready to review again.
Planned time off
Planned time off lets people say ahead of time when they'll be away, and lets a manager, admin or owner approve it. An owner or admin turns it on in Settings → Preferences → Workflow → Planned time off. While it's off, none of this appears.
A plan is not time. Sending or approving a plan makes no time entry and takes nothing from a PTO balance. The hours come off only when the day comes and you log the time as PTO.
Planning time off
You plan time off on My hours, in the Planned time off section. My hours is in the menu under your name, and linked from the top of the Time page.
The PTO card on My hours shows your plans beside your balance, never in it: a Planned line, such as "24.00 h approved · 8.00 h awaiting approval", and a strip under the bar, hatched for approved plans and dashed for plans awaiting approval. Available doesn't change.
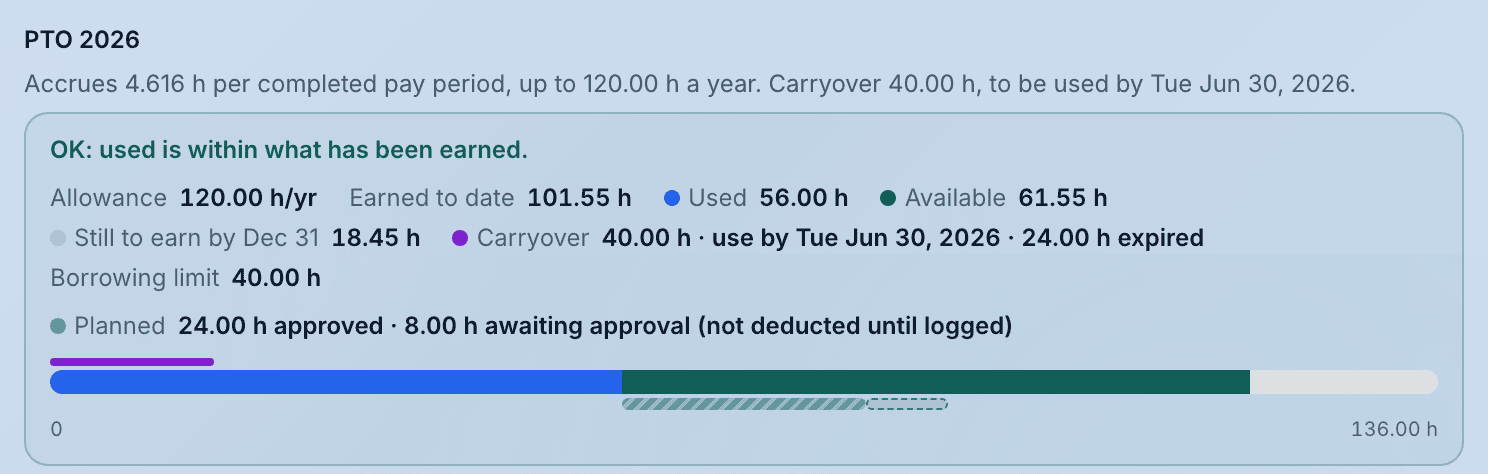
To plan time off:
- On My hours, select Plan time off.
- Pick the First day and the Last day.
- Check Hours in all. Totalizr suggests 8 hours for each weekday from the first day to the last. Change it for a part day, or when a holiday falls in the range.
- Add a note if you like, then select Send for approval.
If your company keeps separate vacation and sick banks, choose the Kind first.
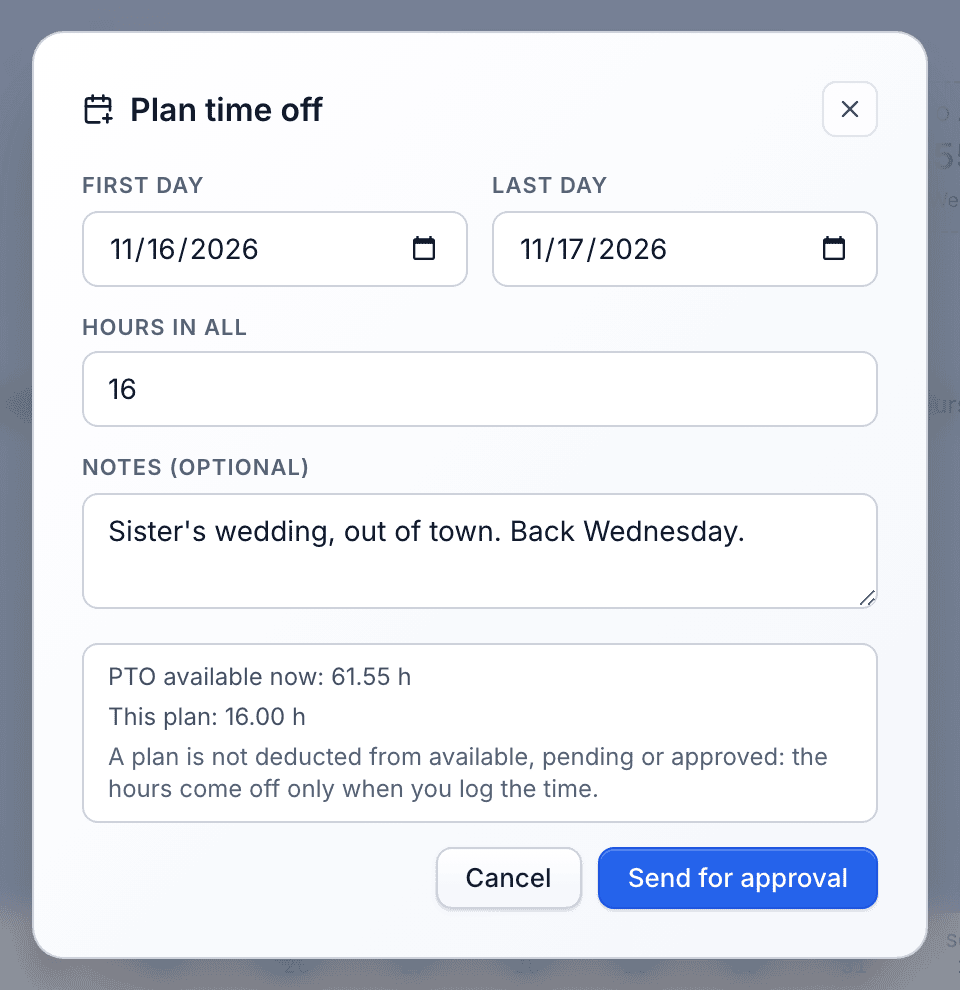
The dialog shows how much PTO you have available now, and reminds you the plan isn't deducted from it. It also warns, without stopping you, when a plan starts less than 14 days from today, covers more than 10 working days, or has hours that aren't a whole number of 8-hour days.
Your plans are listed in three groups: Awaiting approval, Approved, coming up, and Past and closed. Once a plan is approved or declined, it says who decided it, with their note if they left one.
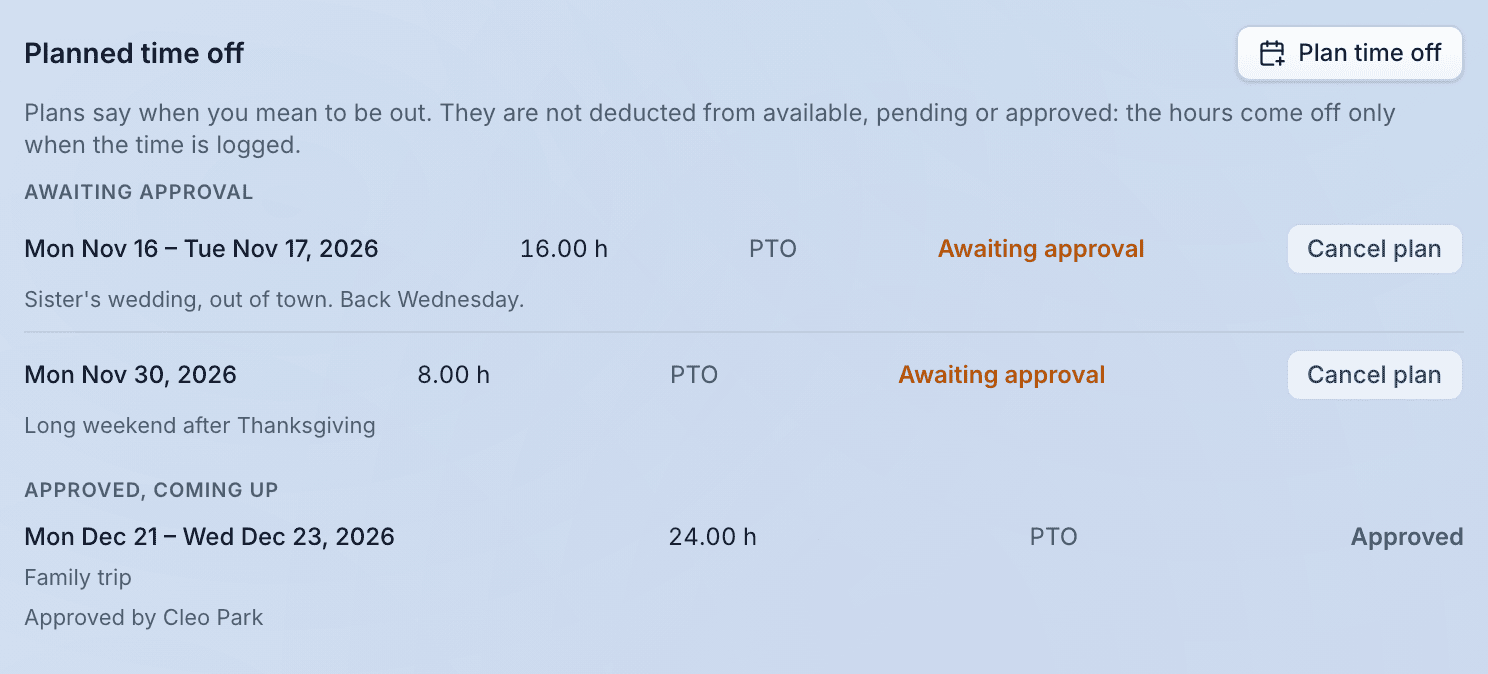
To cancel a plan, select Cancel plan on it. That works while it's awaiting approval, and after it's approved, until its last day has passed. For an approved plan Totalizr asks first, naming who approved it: "This was approved by Name. Cancel it? It comes off Who's out and the team calendar." Add a note if you like, then select Yes, cancel it, or Keep it. A cancelled plan comes off Who's out, and off the shared Google calendar if your company syncs one. Whoever approved it isn't emailed. An approved plan that's over stays as it was, and declined and cancelled plans are closed.
A cancelled plan stays in your list under Past and closed, with who cancelled it and their note.
A manager, admin or owner who opens someone else's My hours sees that person's plans, but can't plan for them. An owner or admin can cancel them on the person's request, with a note such as "cancelled at Name's request". A manager can't cancel someone else's plan.
Approving time off
Managers, admins and owners approve time off. Plans waiting for a decision are listed in Time off to approve, at the top of Approvals, above the time and expense review. The list holds plans from everyone in the company. Any manager can decide any of them, except their own: your own plans never appear in your list.
Each plan shows the person, the dates and hours, the kind, the day it was sent and the person's note. Under it are their PTO available now (the plan isn't deducted from it) and their other plans: how many are approved and coming up, and how many more are awaiting approval.
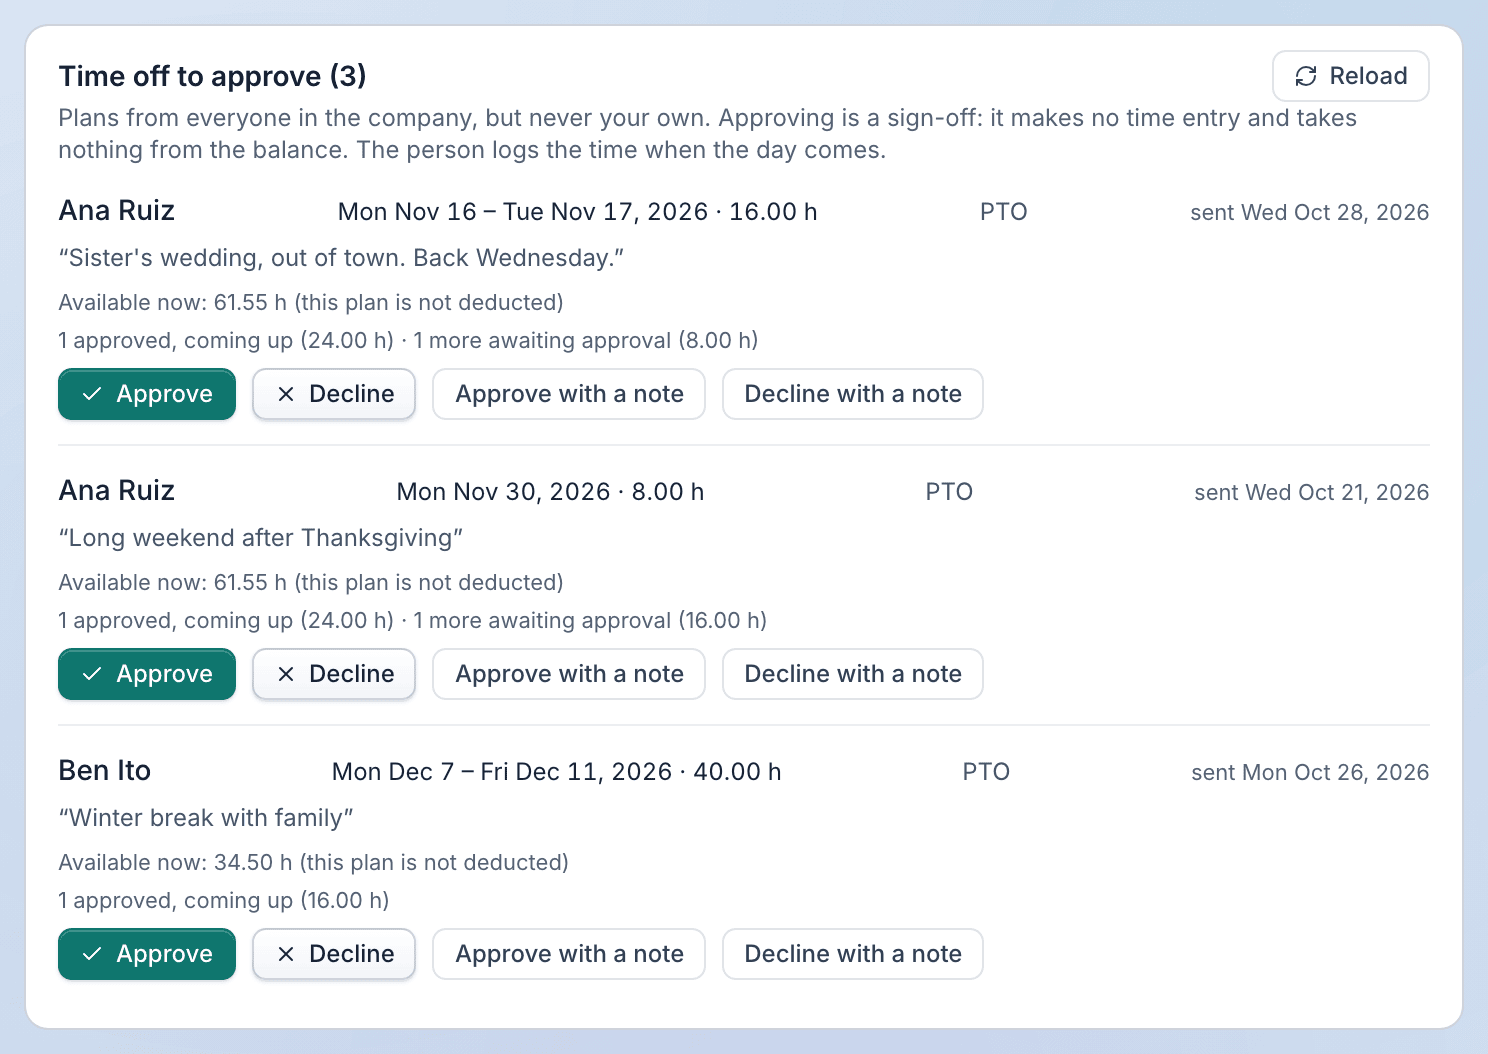
- Select Approve or Decline to decide at once. There's no second question.
- To leave a note for the person, select Approve with a note or Decline with a note, type it, then select Approve with note or Decline with note. Back drops the note.
The person sees the decision, who made it and your note on their My hours page. If the plan changed, or someone else decided or cancelled it, after you loaded the page, Totalizr refuses your decision and asks you to Reload.
You can also approve or decline from the calendar; see Who's out.
Who's out
Team → Who's out is a calendar of planned time off. Everyone has it while planned time off is on. Choose Month or Week, step with the arrows, and select Today to come back.
What you see depends on your role:
- Managers, admins and owners see every plan that's approved or awaiting approval, named with its kind, such as "Name · PTO". A plan awaiting approval has a dashed amber outline and an hourglass. Select a plan to see its dates, hours, status and note; on someone else's plan awaiting approval you can approve or decline it right there. An owner or admin can also cancel someone else's approved plan there, on their request, until its last day has passed.
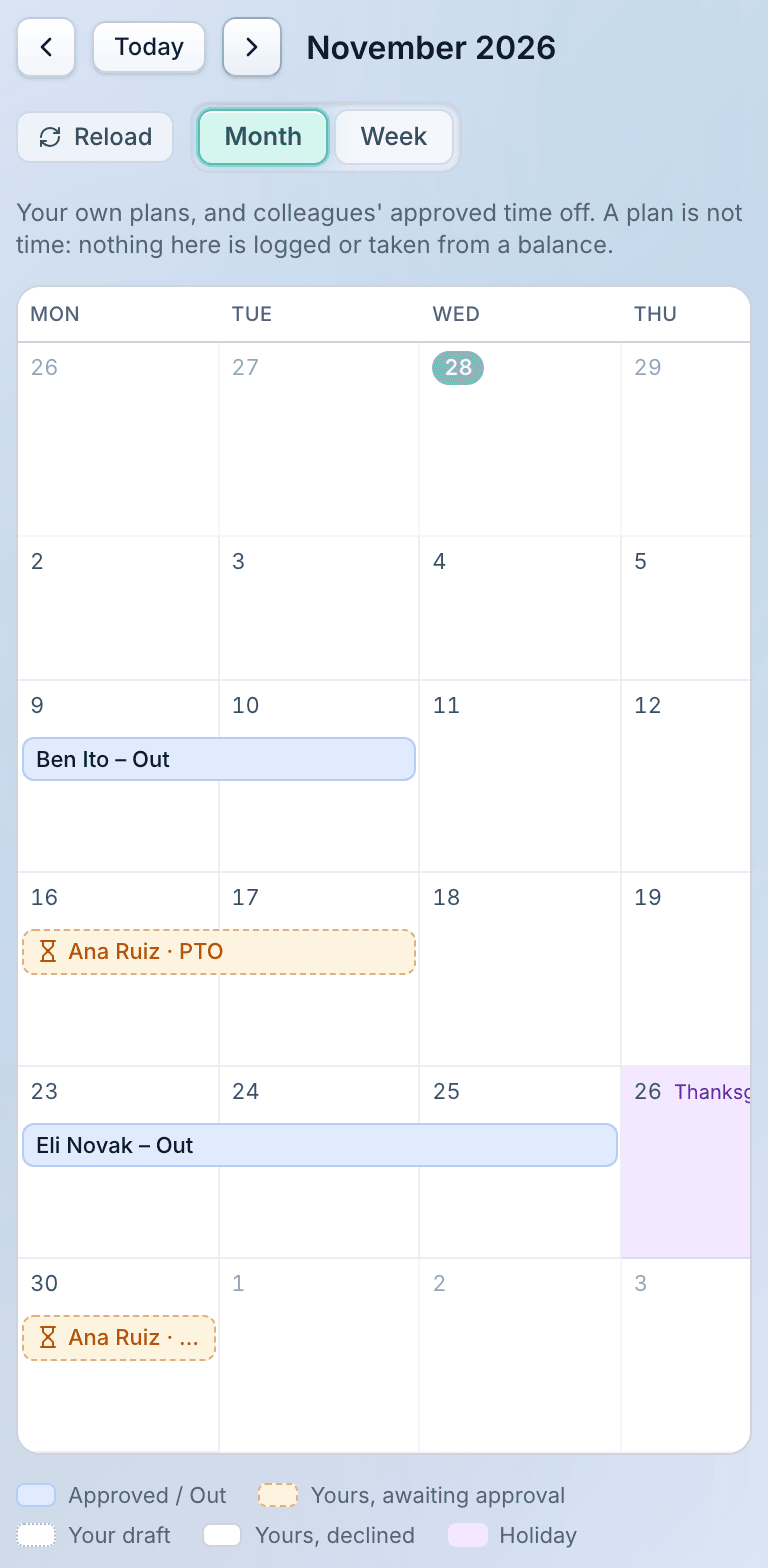
- Everyone else sees their own plans in full, including ones awaiting approval or declined, and colleagues' approved time off as "Name – Out", without its kind or hours.
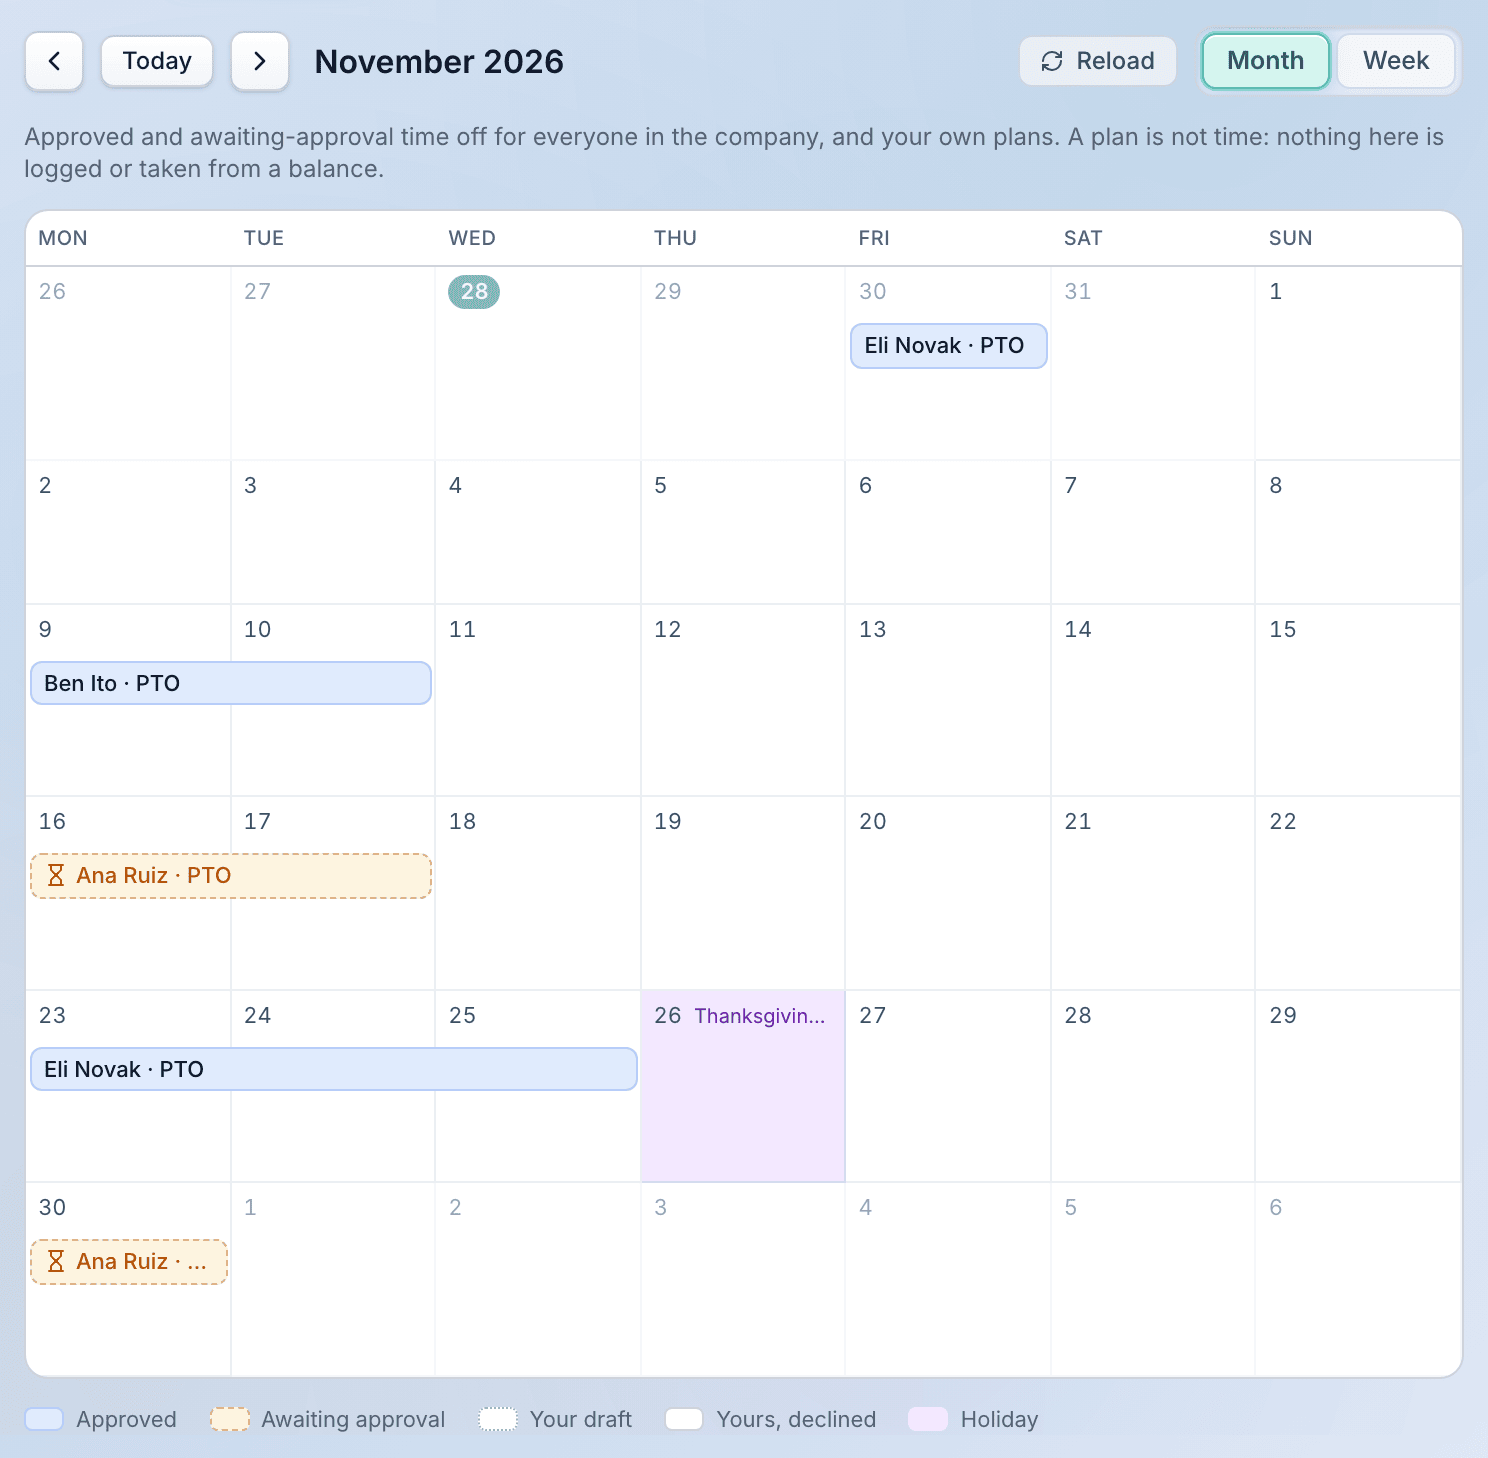
Week view also shows the hours on plans you can see in full. The company's holidays, from Settings → Payroll, are shaded. People who have left the company (deactivated or archived) aren't shown.
If your company connects a Google calendar for time off (see Google Calendar for time off), time off entered directly in that calendar shows here too, read-only, with a dashed outline and a calendar icon ("From Google calendar" in the key). Select one to see its title and dates; there is nothing to approve or cancel. Totalizr matches each entry to a person by an invited guest's email, then by a name at the start of its title (the full name, or "First L.", or a first name nobody else has). Who created the entry doesn't count: whoever keeps the calendar often types everyone's.
- What you see of it follows the rules above: a colleague's entry shows as "Name – Out" to everyone but managers, admins and owners, without its title. An entry Totalizr can't match to anyone shows its title as written: to everyone when the calendar is shared with the team, and otherwise only to managers, admins and owners.
- An entry is left out when you can see its person's Totalizr plan on the same days: the plan is what counts.
- These entries have no hours and count toward no balance or payroll. To count leave, enter it in Totalizr as planned time off.
- If Totalizr can't read the calendar, a note says why, and the plans still show.
On a phone the month is wider than the screen: swipe the calendar sideways to see the rest of each week.
Google Calendar for time off
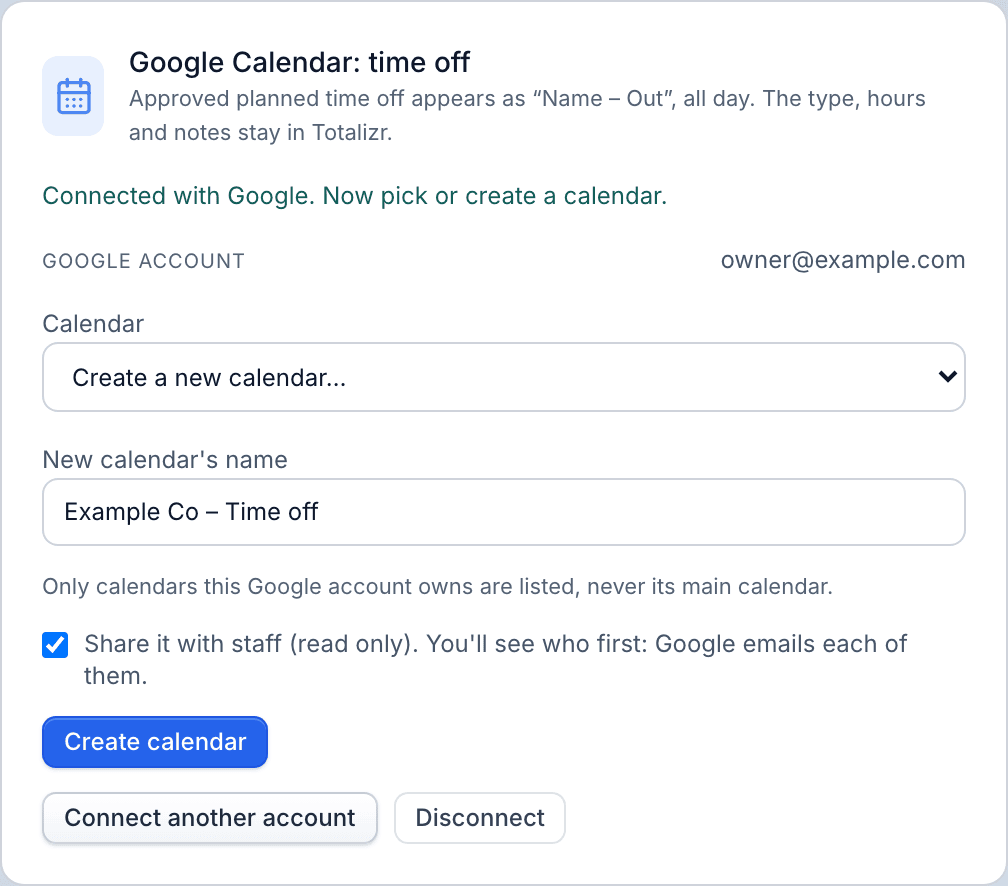
Owners and admins can also put approved time off on a Google calendar shared with the team, so people see who's out in their own calendar. Approved plans go one way, from Totalizr to the calendar. Time off entered directly in the calendar shows on Who's out, read-only: it never becomes a plan and counts toward no balance or payroll. Each approved plan becomes an all-day event called "Name – Out" (the first name, with a last initial or the full name when two people share a first name), shown as free. The kind, hours and notes stay in Totalizr.
To set it up, open Settings → Integrations, find Google Calendar: time off, and:
- Select Connect with Google and sign in with the Google account that should own the time-off calendar. Leave every permission box ticked.
- Under Calendar, pick one of that account's calendars, or choose Create a new calendar… and name it. Only calendars the account owns are listed, never its main calendar.
- Share it with staff (read only) starts ticked. Leave it ticked to share the calendar with everyone; you'll see who before anything is shared.
- Select Create calendar (or Use this calendar).
- If sharing is ticked, Totalizr asks Share this calendar with N people? Select Show names to see who. Select Share with N people to share (Google emails each of them), or Not now.
- Turn on Sync approved time off. Totalizr adds every approved plan, and from then on approving, cancelling or declining a plan updates the calendar.
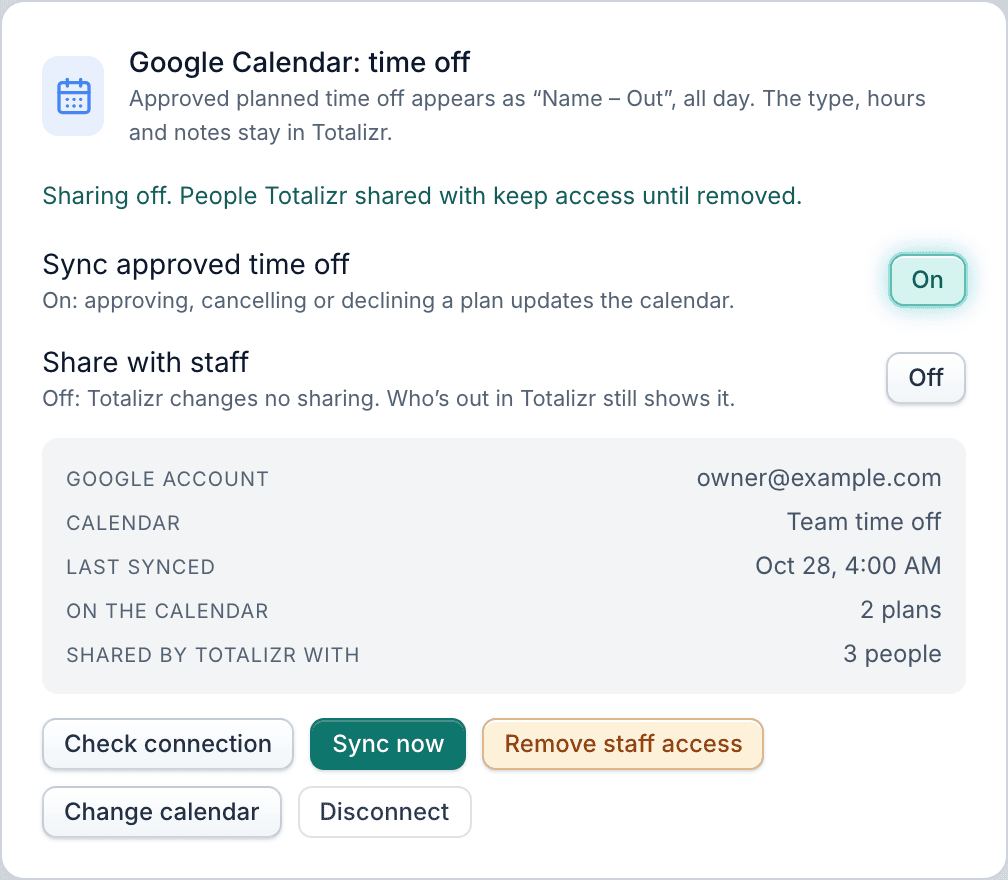
Once it's set up, the card shows the Google account, the calendar, when it last synced, how many plans are on it and how many people Totalizr shared it with.
- Sync now brings the calendar up to date at once, and has Who's out read the calendar again (it otherwise reads it every few minutes).
- Check connection asks Google whether Totalizr can still reach the calendar.
- Share with staff: when it's on, every active person can see the calendar, people who join later are added (Google emails each), and people who leave lose access. Turning it on asks first, as above. When it's off, Totalizr changes no sharing, and the people it already shared with keep access until you select Remove staff access.
- With Sync approved time off off, nothing is written to Google, and events already on the calendar stay until you select Remove synced events.
- Change calendar picks another one. Disconnect makes Totalizr forget the Google access; remove (or forget) the synced events and staff shares first.
If Google stops letting Totalizr in, because the access was revoked or expired, or a permission box was left unticked, the card says Reconnect with Google. Select it and sign in again with the same account, leaving every box ticked.
Forget Totalizr's records is offered only when Google itself confirms that Totalizr can't reach what it made:
- The calendar is gone. Its events and shares went with it. Forgetting clears Totalizr's record of them, so you can pick another calendar, connect another account, or disconnect.
- The account's access is gone. If you can still sign in as that account, use Reconnect with Google instead, so Totalizr can take its events and shares off the calendar itself. If the account is gone, Totalizr can only forget its records; if the calendar still exists, the people it was shared with may still read it, and only its owner can remove them.
Either way Totalizr asks first: select Forget the records, or Keep.
Setting up Google, once. Two steps happen outside Totalizr, once:
- Google Cloud, by whoever runs the Totalizr server. Google Calendar connects through the same Google client as Google sign-in, so sign-in has to be set up first; until it is, the card says "Google sign-in isn't set up on this server". In that client's Google Cloud project:
- Enable the Google Calendar API.
- Add the redirect URI: the sign-in callback's address with the path
/integrations/google-calendar/oauth/callback, for examplehttps://api.totalizr.app/integrations/google-calendar/oauth/callback. - Add the four scopes Totalizr asks for to the OAuth consent screen, each under
https://www.googleapis.com/auth/:calendar.calendarlist.readonly(the calendars to pick from),calendar.app.created(a calendar Totalizr creates),calendar.events.owned(the events) andcalendar.acls(sharing with staff). Totalizr never asks for full access to every calendar.
- Google Workspace, optional, by your Workspace admin. If your Workspace limits third-party apps, Google can block the connection until Totalizr is trusted:
- Sign in to admin.google.com.
- Go to Security → Access and data control → API controls.
- Select Manage Third-Party App Access.
- Select Configure new app, and find Totalizr by client ID (ask whoever runs the Totalizr server for it).
- Choose Trusted.
Expenses and receipts
Use Expenses for costs you paid on a project, such as travel, mileage or materials.
Adding an expense
- Open Expenses and select New expense.
- Check the Date. It starts as today.
- Choose the Project and the Category.
- Enter the Amount ($). For a category with a unit price, such as mileage, enter the number of units instead; Totalizr works out the amount.
- Add a Description of what it was for.
- Attach the receipt (see below).
- Select Save expense.
Expenses you add are billable. A new expense is Pending until you submit it for approval; see Submitting, editing and deleting expenses.
Receipts
To attach a receipt, drag an image or PDF onto the Receipt box in the expense form, or select the box to browse for the file. Totalizr takes JPEG, PNG, WebP, HEIC and PDF files up to 15 MB. Each expense has one receipt. To add or replace the receipt on a saved expense, select its Edit button (the pencil). An approved expense can't be edited: if it has no receipt yet, select Add receipt (the paperclip) on its row. To replace the receipt on an approved expense, a manager sends it back first.
If the expense saves but its receipt doesn't upload, the form says so and keeps the expense. Its details are locked, and the save button reads Upload receipt: select it to try the upload again. Select Close to keep the expense without a receipt.
To see a receipt later, select view in the expense's Receipt column.
The Missing receipts tile at the top counts expenses with no receipt. Mileage doesn't need one.
Proof for mileage and other expenses
A category can require supporting proof (see Expense categories). An expense in that category can be saved without it, but it can't be submitted, or approved, until it has proof:
- Mileage (a category priced per mile): attach a MileIQ report, or a map or trip plan showing the miles, as the receipt. Or enter the Odometer start and Odometer end readings in the form. Two readings fill in the miles for you (end minus start). If you type the miles yourself, they must match the readings.
- Any other category: attach a receipt or other document.
Until it has proof, the expense's row says No proof yet, and Submit is greyed out; point at it to see what to add. An expense already waiting for approval when its category started requiring proof shows No proof yet in Approvals and can't be approved until it has some. Approve all leaves those out. Expenses already approved stay as they are.
On the expense report in the payroll email, a mileage line shows its odometer readings, or Proof attached when a document is on file.
Submitting, editing and deleting expenses
Each expense's row has buttons for what you can do with it:
- Submit sends a pending expense for approval. On a rejected expense it reads Resubmit.
- Edit (the pencil) opens the expense form with its details filled in. Change them and select Save changes.
- Delete (the trash can) removes the expense once you confirm. It can't be undone.
Submit my pending, at the top of the page, submits all of your own pending expenses on the screen, after you confirm. The number on it counts them. It never submits anyone else's expense, or a rejected one; resubmit those from their rows.
A button you can't use is greyed out; point at it to see why. You can only change your own expenses, unless your role is Project Manager, Admin or Owner (see Roles). An expense on an invoice is locked, so it can't be edited or deleted, and one that has been billed can't be deleted.
An approved expense is locked too: nobody can edit or delete it, managers and admins included. To change one, a Project Manager, Admin or Owner selects Send back on its row. It returns to Submitted, you can change it, and it needs approving again. If an earlier payroll already paid it, the next payroll report says so.
If Harvest changes a claim that is approved here, Totalizr doesn't apply the change. The row says what Harvest changed, for example "Harvest changed an approved claim: $48.00 → $52.00." To take Harvest's version, a manager selects Send back: the claim returns to Submitted at Harvest's amount. To keep the approved amount, change the claim back in Harvest; the next sync clears the note. A claim that is on an invoice (in Totalizr or Harvest) can't take Harvest's version by Send back; the note says so.
When an expense is rejected, the reason shows under Rejected in its row and at the top of its edit form. Fix your expense with Edit: saving a change returns it to Pending. Then submit it again.
Expense statuses
The Status column shows Pending, Submitted, Approved, Rejected or Invoiced. The tiles at the top show what is waiting for approval, what is approved but not billed yet, and what was billed this month. Use All projects to show one project only.
Expense categories
Managers and admins set up categories in Settings → Expense categories:
- Select New expense category.
- Enter the Category name.
- For a per-unit category such as mileage, turn on Has unit price, then enter the Unit name and the $ / unit. Only admins and owners can set or change the unit and its price; a project manager sees them but can't edit them.
- To require proof before an expense in the category is submitted or approved, turn on Requires supporting proof (see Proof for mileage and other expenses). Only admins and owners can turn it on or off.
- Save the category.
Use the edit and archive buttons on a category's row to change it or retire it.
Clients and projects
Clients are the companies you bill. Projects hold the work you track time to, and each project usually belongs to a client. Project managers, admins and owners can create and change clients and projects.
Clients
The Clients page lists your active clients with their contact, currency, active projects and open balance (what is owed on sent invoices). Select a client to see its details, contacts, projects and invoice history.
To add a client:
- Go to Settings → Clients (or select Manage on the Clients page).
- Select New client, type the client name and select Save.
- Select Edit on the new client to fill in the address, currency and invoice defaults.
A client's Invoice defaults set the invoice line detail, the due-date terms (Upon receipt, Net 15, Net 30, Net 45 or Net 60; Net 30 when not set), a PO number, tax and discount. A project can override them, and so can a single invoice.
To retire a client, edit it and tick Archived. Archived clients are hidden from pickers; their projects stay intact. To bring one back, go to Settings → Clients, select View archived clients, then Restore on its row.
Client contacts and invoice recipients
Contacts decide who receives invoices. To add one, select Add contact on the client, fill in the name and email, and set Invoice delivery:
- Invoice recipient (To:): invoices are addressed to this person.
- Copied (Cc:) or Blind copied (Bcc:): this person gets a copy.
- Not on invoices: a contact only.
If a client has no To contact, invoices go to the client's own email address. Deleting a contact can't be undone.
Creating a project
- Open Projects and select New project.
- Enter the Project name and a Code (your job number).
- Choose the Client and the Project manager.
- Under Project type, tick what applies:
- Time & Materials: billed by the hour. Add a not-to-exceed amount, or leave it open.
- Fixed Fee: a lump sum billed by percent complete.
- Non-Billable: time is tracked but never invoiced. It can't be combined with the other two.
- Pick a Budget type: No budget, Hours per project or Total project fees, and enter the budget.
- Check the Tasks on this project. Only ticked tasks can be picked when someone tracks time to the project. Common tasks from Settings are ticked for you.
- Select Create project.
A billable project opens on its Contract tab so you can check the contract lines.
You don't set an hourly rate on a project, a task or a project's team: time is billed at each person's rate. Set rates under Team (Edit person) or in Settings → Positions & Rates. See Rate policy.
The projects list
Filter the list by Active, Archived or All, by client, or by manager, or search by name, code or client. Projects are grouped by client. Select Export to download the list on screen as a CSV file.
To archive a project, open the row's menu and choose Archive. Archived projects are hidden from pickers and can't take new time. Restore brings one back.
Inside a project
A project page shows a progress chart and cards for total hours, budget remaining, internal costs, invoiced and uninvoiced amounts. Select Edit project to change its details and budget.
The tabs are Tasks, Team, Fee schedule (fixed-fee projects), Contract (project managers, admins and owners) and Invoices.
Tasks
The Tasks tab lists each task with its hours, billing and budget. Select a task's hours to see the entries behind them.
To add a task, choose it under Choose a task… and select Add task. Task names are set up in Settings → Tasks.
The Billing setting says how the task's hours are billed:
- Follow project: use the project's type.
- Time & materials: bill the hours.
- Included in fee: covered by the fixed fee, not billed by the hour.
- Non-billable: never billed.
Time recorded without a task shows on a No task line. Managers can use Assign task to move those open entries onto a task.
Team and assignments
The Team tab shows who worked on the project, including people no longer assigned. Select a person to focus the charts and task entries on them.
To assign someone, choose them under Choose a person…, tick Project manager if they manage the project, and select Add person. A project can have more than one project manager. The project is on each one's My projects list in Approvals; any manager can approve time and expenses on any project.
To take someone off, select Remove from project on their row.
Budgets
A budget can be in hours (Hours per project) or money (Total project fees). An hours budget counts every hour tracked on the project, billable or not. A money budget counts the billable value of the tracked time. The project page's Budget Remaining card shows what is left, and the chart shows a budget line for an hours budget.
In Edit project you can also:
- Tick Budget resets every month for a monthly budget. A monthly budget counts only the current month's time, in your company's time zone: on the project page (for example "40 hrs a month · October"), on the Projects list and in Reports → Budget. The project's other figures, such as Total Hours, still cover all time, and the chart has no budget line. Task and person budgets reset with it: a task's Budget on the Tasks tab counts only the month (for example "5.00 of 40.00 h in Oct · 13%"), while its Hours still cover all time, and the Team tab shows each person's budget as hours a month.
- Tick Email alert when budget hits and set a percentage. Totalizr checks once a day and emails your admins and owners when the project passes it. A total budget alerts once; changing the budget settings sets the alert up again. A monthly budget can alert once in each month.
On the Projects list, the Budget column shows each budget with its unit, and "/mo" for a monthly one. The budget health bar turns amber past 85% and red past 100%. For a monthly budget it shows the month, for example "31% Oct".
The Contract tab
The Contract tab holds the project's contract components, its schedule of values. Their order here is the order they appear on a worksheet invoice. Each line has a type:
- Fixed fee: billed by cumulative percent complete, less what was billed before.
- T&M — NTE: billed by the hour, with a running total against a not-to-exceed amount.
- T&M — open: billed by the hour with no cap.
To add a line, enter its name, type and value (optional for an open T&M line), choose a part, enter an already billed amount if there is one, and select Add component. Use Move up and Move down to reorder. A line that has been billed can't be deleted.
Already billed is a one-time starting figure for work you invoiced before you used Totalizr. It counts as prior billing, so percent complete never drops below it, and on a not-to-exceed line it counts toward the cap.
Parts split a lump sum into phases, each with its own fee:
- Type A — Design
- Type B — Bidding
- Type C — Construction
Choose No part for a line that isn't split this way.
Under Task mapping, choose which contract component each task's hours bill under. With only one component, every task maps to it. Hours on a task with no component block a worksheet invoice from being finalized.
Rate policy
Totalizr prices time from each person's billable rate on the date of the work. A person with no rate of their own is priced from the rate schedule for their position. See Positions and rates.
On the Contract tab, Rate policy sets which schedule a worksheet invoice's rate card uses:
- Current company rates: each entry bills at the schedule in effect on its date.
- Locked to a version: the project keeps one schedule version.
- Custom project rates: the project has its own rate card. Copy latest company card starts you from the company's rates.
The panel shows the rate card in effect today. A position with No rate blocks a worksheet invoice from being finalized.
Invoice presentation on a project
Also on the Contract tab, Invoice presentation sets the project's Invoice template: Standard, or Worksheet for a cover page plus worksheet sections. A project needs the worksheet template before you can raise a worksheet invoice for it. Client PM, the client's project manager, is printed in a worksheet invoice's header; leave it blank to leave it off.
How much detail a standard invoice shows comes from the line detail level.
Fee schedules
Fixed-fee projects have a Fee schedule tab for billing by milestone.
To plan a milestone, enter its label (it becomes the invoice line), choose a fixed amount or a percent of the project fee, and select Add milestone. Only planned milestones can be changed or deleted.
To bill milestones:
- Select Invoice milestones….
- Tick the planned milestones to bill, or enter an ad-hoc amount and label.
- If you like, include the period's time and materials time and billable expenses.
- Set the Issue date and select Create draft invoice.
Recurring fee lines are added to generated invoices automatically: on every invoice, or at most once a month or quarter. Turn a fee off to pause it; deleting it leaves past charges on their invoices.
Fee buckets are named parts of the fee. Hours on the tasks you map to a bucket draw it down, so you can see what is left in each.
Estimates
An estimate is a priced proposal you give a client before the work is billed. Admins, owners and bookkeepers create estimates. Open Estimates from the menu. On a phone, it's in the sheet behind the Settings tab.
To create one:
- Select New estimate.
- Choose the Client, and check the Issue date and Currency.
- Enter a Subject.
- Add the line items: description, quantity and unit price. Select Add line for more.
- Select Create estimate.
While an estimate is a draft, select Edit on it to change its line items, issue date, subject or notes, then Save changes. Once it's marked as sent it's locked and can't be edited.
Totalizr doesn't email estimates. Send the estimate yourself, then record what happened:
- Mark as sent when you've sent it.
- Mark accepted or Mark declined when the client answers. Back to draft returns a sent estimate to draft.
- Revert takes an accepted or declined estimate back to sent.
To bill an accepted estimate, select Create invoice. Totalizr makes a draft invoice for the client with the estimate's lines, issued today and due in 30 days. The button then links to that invoice.
Use the status filter (All, Draft, Sent, Accepted, Declined) to find an estimate.
Invoices
Admins, owners and bookkeepers create and send invoices.
The invoices list
The Overview tab of Invoices lists your invoices with their status, due date, issue date, number, client and balance. Switch between Open (drafts and sent invoices) and All invoices, and search by number, subject or client.
An invoice is Draft, Sent, Paid, Closed or Void. A sent invoice that is partly paid also shows Partial. The due column says how many days are left, or how many days overdue it is.
Under the list, a line such as "Showing 26–50 of 132 invoices" says which ones are on screen. Choose how many show at once with Per page (25, 50, 100 or 200; this browser remembers your choice), and use Prev and Next to move between pages.
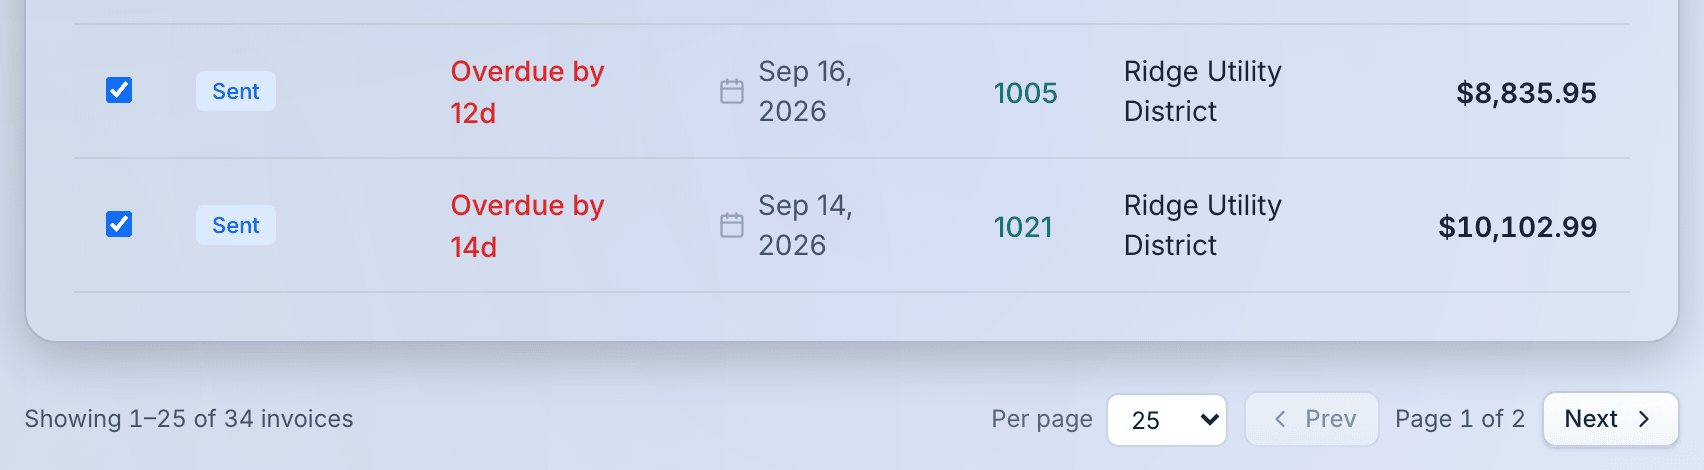
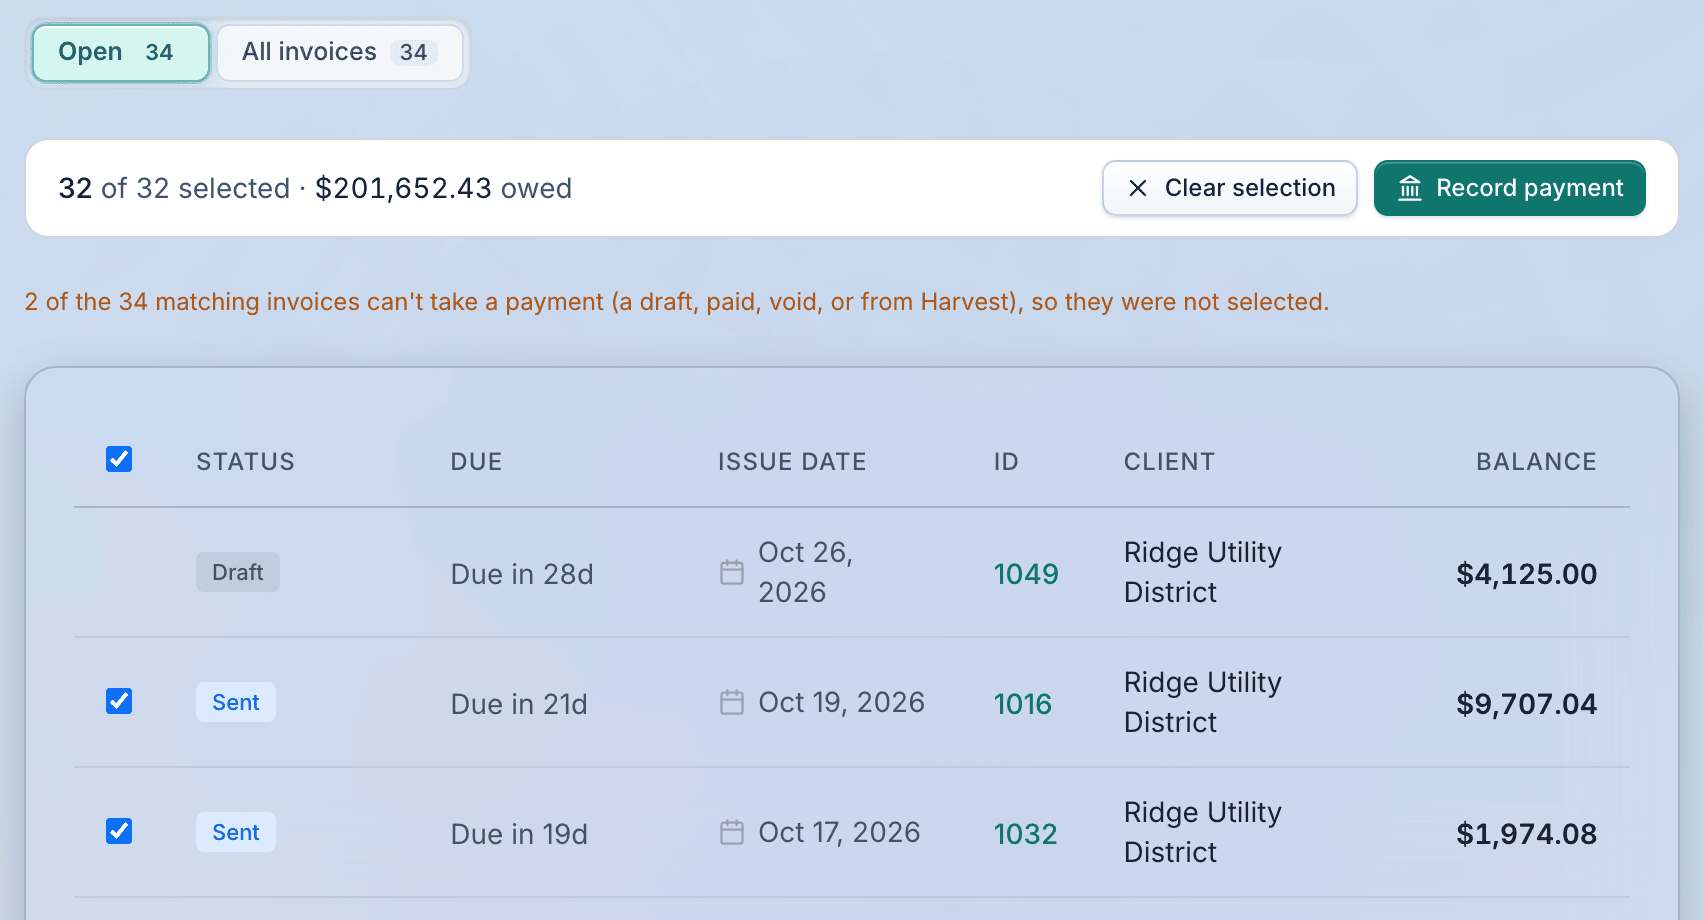
If you record payments (admins, owners and bookkeepers), each invoice that can take a payment has a box: a sent invoice with a balance, not one from Harvest. Tick invoices to record the payment that paid them; see Recording a deposit that pays several invoices.
- The box in the header ticks every invoice that can take a payment in the tab and search you're on, on every page, not only the one on screen. If some can't, a line says how many were left out.
- Untick the header box, or select Clear selection, to clear them all. Changing the tab or the search clears the selection too, and says so.
- The bar above the list counts what's ticked, such as "54 of 55 selected · $5,400.00 owed". One payment pays one client's invoices, so Record payment needs invoices of a single client: search for the client first, then tick the header box.
- Record payment says again how many invoices it covers, with what it applies and what was received, before you record it.
The cards at the top show Total Open, what is owed on sent invoices (drafts aren't counted until they're sent), and Total Paid. The chart beside them shows the last 12 months: each bar is what was invoiced that month, by issue date, split into what is still open and what has been paid. The Report tab shows receivables aging: what each client owes, in 0-30, 31-60, 61-90 and 90+ day buckets.
The other tabs:
- Receivables lists the sent invoices that still have a balance, and lets you mark several as paid at once. See Marking invoices received.
- Recurring and Retainers list any recurring invoices and retainers already set up. They can't be created from these tabs.
- Configure says where the invoice settings are. Open invoice numbering goes to Settings → Preferences → Invoice numbering. Payment terms, PO number and tax are set on each client, and a project can change them under Edit project → Invoice defaults.
Creating an invoice from time
To bill a client's unbilled time:
- Select New invoice and choose Hourly.
- Choose the Client.
- Set the billing period dates. The period starts as the current month.
- Under Projects to bill, tick the projects this invoice is for. The list shows each of the client's projects with unbilled time or expenses in the period, and the hours it would bill. Nothing is ticked to start with; Select all ticks every project that can be billed here. A project that can't be ticked says why: a worksheet project, or one with nothing left to bill in the period.
- Select Pull period.
- Check what was pulled: the hours and the billable expenses of the ticked projects. Hours read as decimals (1.75 h), as the invoice prints them. A chip shows any hours not approved yet. Usually they are included ("not yet reviewed — included"). If your company has turned on Require timesheet approval, they are left out ("not approved — left out") and wait for a later invoice.
- Left out of this invoice lists the ticked projects' hours the invoice won't bill, and why: already on an invoice, already billed in QuickBooks or outside Totalizr, non-billable, not approved, not billed by the hour (a fixed fee, or a task that doesn't bill), or rounding to 0 h.
- Choose the Line item detail (see below).
- Untick any expenses you want to leave out.
- Tick Hours by staff to add a summary of hours per person.
- Check the subject and due date, then select Create draft.
Totalizr opens the new draft. Pull period only shows what would be billed and changes nothing. Create draft locks the time and expenses on the draft; deleting the draft unlocks them. Time recorded after the draft was made goes on a later invoice.
Time on a worksheet project is left out of hourly invoices. Bill it with a worksheet invoice.
Line detail levels
Line item detail decides how the time is listed on the invoice:
- Per entry: one line per day, task and person, with the entry's notes.
- Person × task: one line for each person and task on each project, with the date range. This is the usual default.
- Per person: one line per person per project.
- Project total: one line per project.
At every level, time at different rates is on separate lines. The level comes from the invoice if you choose one, otherwise from the project, then the client, then the company default in Settings → Preferences → Invoice presentation.
Other kinds of invoice
New invoice also offers:
- Progress: bill by percent complete. For each phase you enter its value, the percent billed before and the percent complete now; Totalizr bills the difference.
- Fixed price: one amount and description. It isn't tied to time entries, so the hours stay unbilled.
- Custom: any line items you type.
- Worksheet: shown when a project uses the worksheet template. See below.
Worksheet invoices
A worksheet invoice bills a project from its contract: each fixed-fee component by percent complete, and hourly work from the project's rate card. The project needs the worksheet template (see The Contract tab).
To create one:
- Select New invoice and choose Worksheet.
- Choose the Worksheet project and the billing period. Time recorded in the period fills the draft.
- Set the issue and due dates if you need to; they default to today and the client's terms.
- Select Generate worksheet draft.
To work on the draft, open it and select Edit invoice:
- Under Fixed fee — Schedule of Values, enter each component's cumulative % complete. It can't go below the previous percent or above 100. The Prior column shows what was billed before, and Due this invoice shows the difference.
- Under Hourly — rate card, change the Billed hours for a position if you need to. Entering 0 writes all of them down. Add a position with + Add position. For a not-to-exceed line, chips show the cap, the prior billing, this invoice and the balance, with a warning at 90% and over the cap.
- Your changes wait until you select Apply changes. Until then the amounts are estimates. Discard throws them away.
When the invoice is sent, it is finalized: every entry in the period is marked billed. Hours you didn't bill don't carry forward.
On the PDF, previous invoices appear as Less Sum of Previous Invoices above This Invoice.
The QuickBooks comparison banner
If your company raises invoices in QuickBooks, a worksheet draft shows an amber banner comparing the job's invoiced total in QuickBooks with Totalizr's previous invoices. If QuickBooks shows invoices raised before you used Totalizr, enter them as Already billed on the project's Contract tab. The banner also says when the totals can't be compared, for example when the job has no QuickBooks link. The check only reads QuickBooks; it never writes to it.
Finalize blockers
Totalizr won't send a worksheet invoice while something would bill wrongly. The editor shows each problem in red as "Finalize is blocked", with a link to where you fix it:
- Hours with no position: someone with time in the period has no position. Set it on the Team page, or move the hours.
- No rate: a position on the invoice has no rate on the project's rate card. Add it under Rate policy on the Contract tab.
- A running timer: stop the timer first.
- Out of date: hours in the period changed after the draft was made. Undo the change, or delete the draft and generate it again. A new draft loses your percent complete and hours edits.
- Tasks with no contract component: map the tasks under Task mapping on the Contract tab, then delete the draft and generate it again.
- Billing a finished component again: a component already at 100% would be billed a second time.
A separate warning, Not on this draft, lists entries dated in a period that an earlier worksheet invoice already covered. Sending leaves them unbilled; it doesn't write them off.
The billing run
A billing run makes hourly invoices for many projects at once, one invoice per project, from all unbilled time in a period.
- On Invoices, select Billing run.
- Choose the Billing period: Month, Semi-month, Week or Custom. It starts on last month. Use the arrows to move, and the date button to go back to the last complete period.
- Check the projects. They are grouped by client and all ticked; untick any you don't want. Worksheet projects can't be included; bill them with a worksheet invoice.
- Look at the unreviewed badges. A badge such as "2:30 unreviewed · Alex P. 1:30, Sam R. 1:00" names whose time hasn't been approved yet. Those hours are still included. If your company has turned on Require timesheet approval, the badge reads "not approved — left out" instead, and those hours wait for a later run.
- Select the Preview button (it counts the invoices) to see each invoice's lines. A project that can't be previewed shows Not in this run and the reason.
- Finish with one of these:
- Keep as drafts: make the invoices as drafts, to check before sending.
- Generate & send…: make the drafts, then open Send drafts with them ticked, where you choose how they go out (QuickBooks included) and confirm. Nothing is emailed until you confirm there.
The result lists each invoice with a Sent or Draft badge, and any projects that need attention. While some are still drafts, Send these drafts… opens Send drafts on them.
Sending an invoice
- Open the invoice and select Send invoice.
- Check To. It's filled from the client's To contacts. An address you type replaces them.
- Leave Copies ticked to copy the client's Cc and Bcc contacts.
- Check the Subject and Message. The PDF is always attached.
- Tick Push to QuickBooks Online on send if you want the invoice in QuickBooks too.
- Select Send invoice.
The email usually goes out within a minute. Reload the invoice to check: Latest activity at the top says if delivery failed. The time and expenses on a sent invoice are locked; see Locked and billed time.
Resend invoice sends a sent invoice again. To send many drafts together, see the next section.
Sending several drafts at once
Send drafts, on the Invoices page, lists every draft invoice. Each row shows who it will be emailed to and what will happen in QuickBooks: Ready with the QuickBooks customer it posts to ("(new)" when QuickBooks will create that customer), already in QuickBooks, or the reason it can't be pushed.
- Select Send drafts.
- Tick the drafts to send. The ones that can go are ticked already. A draft that can't go in a batch shows why in amber: its client has no invoice email, or it is a worksheet invoice, which you send from its own page because sending finalizes its period.
- Choose the options for the whole batch:
- Record each in QuickBooks after it is sent: each invoice is pushed right after its email, exactly as the QuickBooks button on an invoice does it. It starts off if your company raises its invoices in QuickBooks, so you don't make a second copy.
- Copy each client's CC and BCC invoice contacts: untick it to send to the To contacts only.
- Subject and Message: leave them blank to use each invoice's usual ones.
- Select Send and confirm.
Totalizr sends the drafts one at a time and shows each result as it goes. One that fails doesn't stop the rest. A row that needs attention says what happened and how to finish, for example "push it from the invoice's QuickBooks button". The total at the bottom counts what was sent, what was recorded in QuickBooks and what needs attention.
Editing, deleting and voiding
- Edit a draft: select Edit invoice. Line item changes save row by row. Invoice details… changes the subject, PO number, dates, tax, discount and notes. Select Done editing when you finish. Only drafts can be edited.
- Delete a draft: Actions → Delete draft. Its time and expenses go back to unbilled.
- Void a sent invoice: Actions → Void invoice, type a reason, and confirm. Its time and expenses go back to unbilled, and any linked fee milestones are reverted. The invoice number is kept. Voiding can't be undone.
- Remind the client: Actions → Send payment reminder on a sent invoice that is past due.
PDF and printing
Select PDF to open the invoice in a viewer with Open in new tab and Download. Select Print to print it. In the desktop app on a Mac, select Open in browser to print to print the invoice from your browser.
Project managers see the invoice and print it too. Their PDF opens the PDF last made for the invoice, the one sent to the client or an admin's or bookkeeper's latest. If none has been made yet, it says so; Print gives the same document.
Payments and deposits
Admins, owners and bookkeepers record payments. If your company uses QuickBooks for payments, see Paid status from QuickBooks.
Recording a payment on one invoice
- Open the invoice and select Record payment.
- Check the Amount. It starts as the balance due.
- Set the Paid Date and add Notes, such as a check number or wire reference.
- Select Record payment.
The Payments card on the invoice lists its payments. To remove one, select delete, then Yes. A payment that came from QuickBooks is changed or removed in QuickBooks, not here; the next read-back updates Totalizr.
Marking invoices received
The Receivables tab on Invoices lists every sent invoice that still has a balance, with its client, when it's due and the balance. Use it to record payments on several invoices at once, each paid in full or in part. Its pages work like the invoices list's, and it remembers its own Per page.
- Tick the invoices that were paid. The box in the header ticks every one that can be paid here, on every page, and says how many it left out. Untick it, or select Clear selection, to clear them.
- Check each one's Payment date (today to start) and Amount ($) (its balance to start).
- Select Mark as received.
- Totalizr asks first, with how many payments, their total and their dates, for example "Record 3 payments totalling $4,250.00, dated Oct 27, 2026? One payment is recorded on each invoice, in Totalizr." Select Mark as received to record them, or Cancel.
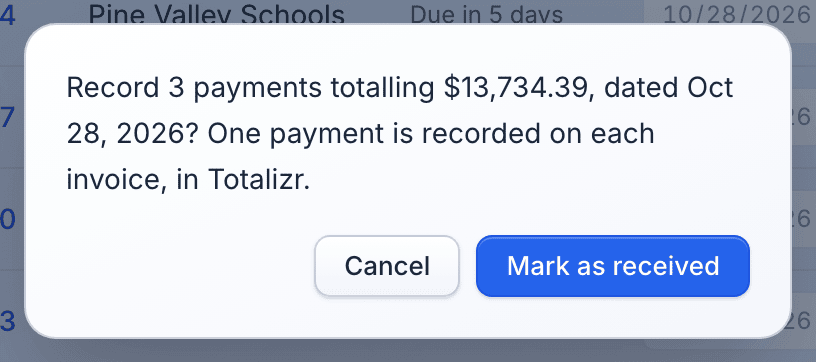
Totalizr records one payment on each ticked invoice, the same as Record payment on the invoice. Then it says what happened to each one:
- When every payment was recorded, it names the invoices and the total.
- Otherwise it says how many were recorded, and for each of the rest, either Not recorded, with the reason, or No answer. No answer means Totalizr didn't get a clear reply (the connection dropped, or the server failed), so that payment may have been recorded. Open the invoice and check its payments before you mark it again.
A ticked invoice with no amount or no date stops the run before Totalizr asks, and nothing is recorded. An invoice that came from Harvest is listed, but its box can't be ticked: record its payment in Harvest.
Recording a deposit that pays several invoices
Use a deposit when one payment from a client covers several of its invoices.
- On the Invoices list, tick the sent invoices the deposit pays, then select Record payment in the bar that appears. All the invoices must belong to the same client. You can also start from the client's page with Record payment.
- Enter the Amount received, the date it was Received, the Method (ACH, Check or Other) and a Reference, such as the check number.
- Under Invoices this pays, tick each invoice. Totalizr fills in its open balance; change it if the client paid a different amount.
- Make sure the amounts applied add up to the amount received. Totalizr doesn't keep a credit for the client, so the whole amount must be applied.
- Select Record payment.
To put the payments in QuickBooks too, tick Also record in QuickBooks. Totalizr shows the payments it will create, then records them in QuickBooks in Undeposited Funds, ready for your bookkeeper to match against the bank deposit.
The client's page lists deposits under Payments received. If a QuickBooks payment didn't finish, use Retry QuickBooks, or Record in Totalizr only.
QuickBooks
Totalizr connects to QuickBooks Online to push invoices, to read back what has been paid, and to bring in time tracked in QuickBooks. An admin sets up the connection.
Connecting QuickBooks
- Go to Settings → Integrations.
- On the QuickBooks Online card, select Connect to QuickBooks and sign in to QuickBooks.
- Tick Push invoices to QuickBooks to allow invoices to be pushed.
- Under Invoice lines, choose the QuickBooks product for time lines, and optionally one for expense lines.
- Open Customer map to match each Totalizr client to its QuickBooks customer. Accept all matches takes every suggested match. For the rest, pick a customer and select Link.
To bring time tracked in QuickBooks into Totalizr, also tick Import timekeeping from QuickBooks. See QuickBooks time sync.
Disconnect and Re-authorize are on the same card.
Pushing an invoice to QuickBooks
- Open a sent invoice and select QuickBooks.
- Check the preview: the customer (marked "(new)" if QuickBooks will create it), the product, terms, document number, bill-to address and every line. Warnings are in amber; problems that stop the push are in red.
- Select Push to QuickBooks and confirm.
The invoice then shows its QuickBooks number. You can also push while sending: tick Push to QuickBooks Online on send in the send window.
Some invoices can't be pushed:
- A draft. Send it first.
- A void invoice.
- An invoice with tax. The push doesn't send tax.
- An invoice imported from Harvest. You can preview it, but not push it.
Paid status from QuickBooks
When an invoice is in QuickBooks, QuickBooks is where its payments are recorded. Totalizr reads the paid status back every night. To check now, select Refresh from QuickBooks on the Invoices list or on the invoice. The invoice shows "Paid in QuickBooks" or the QuickBooks balance, with when it was last checked.
For an invoice that isn't in QuickBooks, Totalizr keeps the paid status itself, from the payments you record.
If you invoice in QuickBooks
Some companies raise their invoices in QuickBooks and use Totalizr for time. An admin turns this on in Settings → Preferences → Invoicing with Invoices are created in QuickBooks. Then:
- Totalizr reads invoice totals from QuickBooks. Sync now refreshes them.
- Time a QuickBooks invoice already billed is locked. See Locked and billed time.
- Reports show amounts invoiced in QuickBooks, and the Uninvoiced report is hidden.
- Worksheet drafts show the QuickBooks comparison banner.
- The send window's QuickBooks box starts unticked.
QuickBooks time sync
If your company tracks time in QuickBooks or QuickBooks Time, Totalizr can bring that time in. An admin or owner ticks Import timekeeping from QuickBooks in Settings → Integrations, then runs the first import from Settings → Import: on the QuickBooks — Time-keeping import card, select Import time data.
After that first import, the QuickBooks time sync keeps Totalizr up to date every night. It brings in new time, and corrections made in QuickBooks to time it already brought in. A change it can't safely make, for example to time that is on an invoice or was billed in QuickBooks, isn't made; it's listed for review in Import History instead.
To sync straight away, an admin or owner selects Sync now under QuickBooks time sync on the same card. The line beside it says when the last sync ran and what it did, such as how many entries were new, updated or unchanged. It turns amber when something needs a look, with the details in Import History, and red with the reason when a sync failed.
Reports
Project managers, admins, owners and bookkeepers can open Reports. Billable rates and amounts show to everyone who can open a report; cost figures show to admins and owners only. A hidden amount shows as a dash.
Choosing the report period
Pick a span: Week, Pay period, Month, Quarter, YTD (the year to date) or Custom (any two dates). Reports open on the current week. Use the arrows to step to the span before or after, and select the dates between them to come back to today. Pay period follows your company's pay schedule, set in Settings → Payroll, and names its frequency beside the dates. The Budget and Payroll reports have their own periods.
On Summary and Detailed, tick Approved only to count approved hours only.
What each report shows
- Summary: everyone's hours in the span, four ways, then the money. See The Summary report.
- Detailed: every time entry, filtered by person, client, project, task, billable and hour type (Billable, Overhead, PTO / time off or Holiday). The Status column shows the invoice an entry is on, whether it's approved, and a lock if it's locked. It lists up to 10,000 entries. Past that it says "Showing the first 10,000 of N entries", on screen and on paper; narrow the dates or filters for a complete list.
- Uninvoiced: billable time and expenses not on an invoice yet, by project. It's hidden if your company invoices in QuickBooks.
- Profitability: revenue, labor, expenses, cost and margin by client or by project. Cost and margin are for admins and owners.
- Expenses: expense totals by category, project, person or client, split into billable and non-billable.
- Budget: each project's budget and what is left of it, with the hours spent and the billable, invoiced and uninvoiced amounts over the project's whole life. For a budget that resets every month, Remaining counts only the current month (see Budgets).
- Utilization: each person's hours and billable hours against their capacity for the period.
- Payroll: for admins and owners. Each employee's hours per day for a pay period, split into regular, overtime, 1099, holiday and time off, and the approved expenses owed to them (Expenses: each expense approved in the pay period, whatever day it was spent), with Grid CSV and Hours for ADP (CSV) downloads. Hours for ADP has the tab's columns and totals, to read while you enter payroll in ADP. Email me this period emails you the payroll report for the period on screen, marked "TEST:" (see Payroll under Settings); a period still being worked says "in progress". Tick Approved only to count approved time only. Payroll is set up in Settings → Payroll.
The Summary report
Summary starts with everyone's hours in the span, exactly as logged. Timers still running are left out.
- Hours by type: cards for Total, Billable, Overhead, PTO (or PTO, Vacation and Sick, if your company keeps separate banks) and Holiday. A line under them says how many hours aren't approved yet, and whether Approved only leaves them out.
- Hours by person: one row per person, split the same way, with an Unapproved column. Managers, admins and owners also see each person's PTO available today.
- Hours by project: one row per project. Your company's overhead project comes first, open and broken out by task code. Other non-billable projects come next, then billable ones. Select the arrow beside a project to show its tasks.
- Heat map: projects down, and days, weeks or months across. A week or pay period shows days, a month or quarter shows weeks, the year to date shows months, and a custom span picks by its length. The darker a cell, the more hours.
Select any card, cell or total with hours to open a panel of just those entries: the date, person, project and task, notes and hours, with the total at the foot. An entry that isn't approved yet is marked. The panel is a short list; Detailed is the full one.
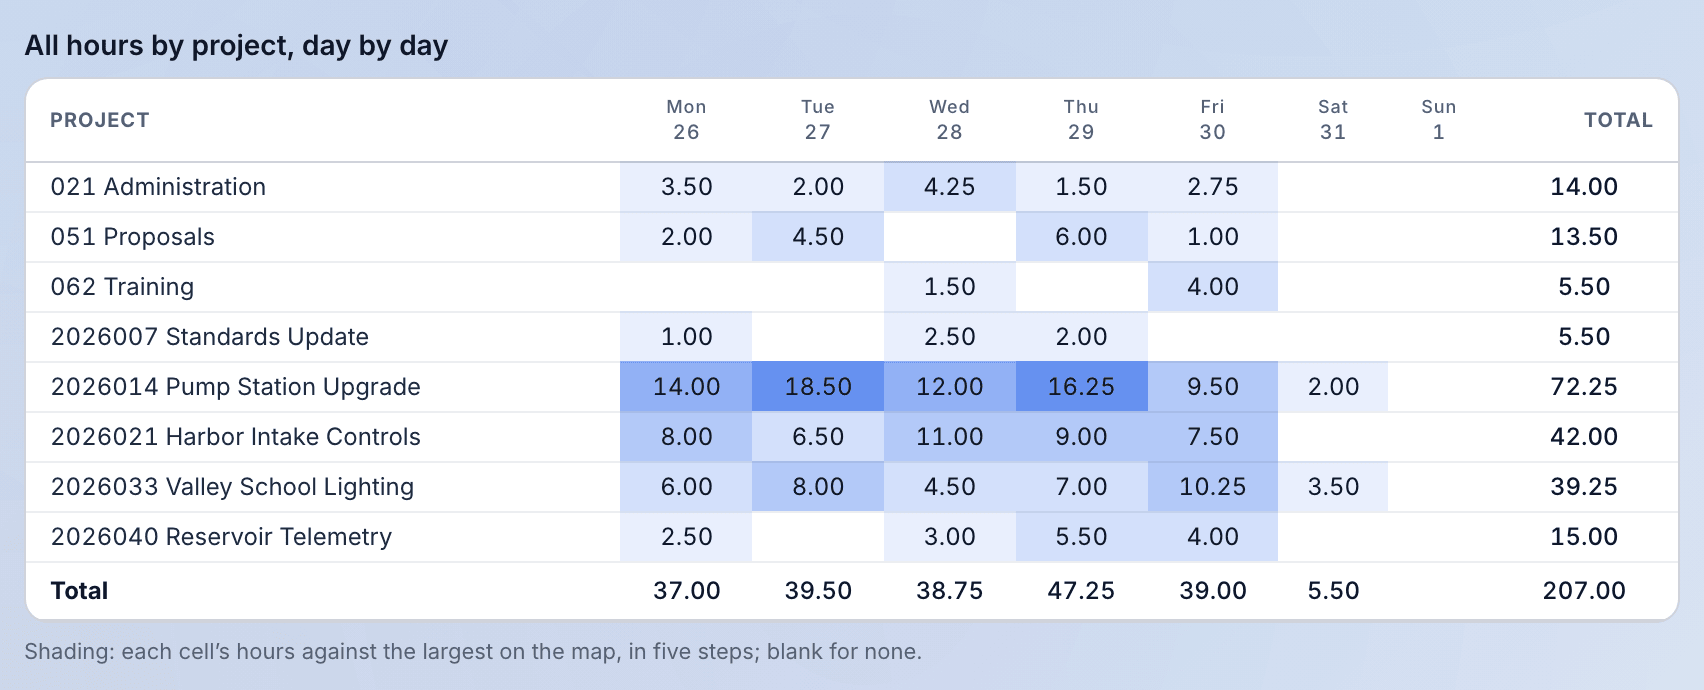
Under them come the Billable amount and Cost amount, a chart of how the hours split, and a table grouped by Clients, Projects, Tasks or Team. If your company rounds time, that table rounds each entry up as invoices do, so its hours can differ from the cards above, and the line under the cards says so. Select a row to see its entries in Detailed.
Exporting
Most reports have an Export or Export CSV button that downloads a CSV file. In the desktop app, the CSV opens in a window with a Copy button instead, so you can paste it into a spreadsheet.
Printing reports
Print, beside the page title, prints the tab on screen. The printout starts with your company, the report, the span, what narrows it (such as Approved only and any filters), and the day it was printed. A list that stops short says so on paper too, with how many entries it holds of how many there are. Where the app can't print, the button is Open in browser to print instead, which opens the same tab and span in your browser.
Moving entries to another project
Project managers, admins and owners can move time that was logged to the wrong project.
- In Reports → Detailed, tick the entries to move.
- Select Move….
- Choose the project to move them to, and a task, or keep each entry's task.
- Type the project's code or name to confirm.
- Check the summary of what will move, what is already there, what can't move, and which invoices are affected. Then move the entries.
Hours, dates, rates and approval are kept. Invoiced entries stay locked and linked to their invoice, and only an admin can move invoiced or locked entries. Afterwards, Totalizr shows each affected invoice's current lines next to what it would show after regeneration. When the client and total don't change, an admin or bookkeeper can select Regenerate lines in place.
Team
The Team page
Team shows each person's hours, utilization, capacity, billable share and when they were last active, for the week you pick. Cards at the top add up the team's capacity, hours logged and average utilization. Choose Active people or Everyone, and select Export for a CSV of names, emails, roles, positions and status.
Look out for these badges:
- No rate: the person has no billable rate in effect, so their time will invoice at $0.
- Not invited or Invited: whether they have been sent a sign-in invite.
- Archived or Deactivated: they can't sign in or log time.
Admins and owners set each person's Position in its column on the Team page.
While planned time off is on, the Team page also has a Who's out tab, a calendar of everyone's planned time off. See Who's out.
Inviting people
Admins and owners invite people:
- On Team, select Invite person.
- Enter the First name, Last name and Email.
- Choose the Role (see below).
- Set their Capacity (h/wk). It starts at 40.
- Enter their Rate ($/hr). It becomes their billable rate from today.
- Select Send invite.
To add someone now and invite them later, tick Add to team now, send the invite later. When they're ready, choose Send invite from their row's menu. Copy invite link gives you the link to share another way.
Roles
Each person has one role in each company:
- Owner: everything, including the subscription and company settings.
- Admin: all data, people, rates and most settings.
- Project Manager: manages projects and clients, sees the team's time, reports, invoices and estimates, and approves time and expenses on any project, starting from the projects they manage.
- Member: their own time and expenses.
- Contractor: their own time on the projects they're assigned to, with no rates.
- Bookkeeper: invoices, payments and reports. They can read time but not approve it.
What each role sees and does:
- Members and contractors don't see Approvals, Invoices, Estimates or Reports, or money figures elsewhere, such as a client's open balance or a project's invoices. On Team they see each colleague's name, role and work email only: no hours, capacity, position, phone or last sign-in.
- Project managers approve on any project; their list opens on the projects they manage, if they manage any (see My projects and All projects). They can pick a person on the Time page and on My hours, and see each person's PTO available in Reports. In Settings they can also read Company, Roles and Positions & Rates, without changing them.
- Anyone who approves can approve their own time and expenses.
- Billable rates and amounts show to anyone who can open the page they're on: they are the company's billing rates, not anyone's pay. Cost rates, and figures worked out from them, such as cost and margin, are for admins and owners only, and only they can set them.
- Deleting an approved time entry is for admins and owners only. Anyone else changes the entry instead, and it goes back for approval unless a manager, admin or owner changed it. See Notes, editing and deleting and Pending, submitted, approved and rejected.
Being a project manager on a project is separate from the role: tick Project manager when you add someone on the project's Team tab. Settings → Roles shows what each role can do, and lets an admin change a person's role.
Editing a person
Admins and owners choose Edit person from the person's row menu. There you can change their name, role and capacity, and tick:
- Overtime exempt.
- Deactivated: hides them from pickers; they can't log time.
Billable and cost rates are dated. To change a rate, enter the New rate ($/hr) and the date it is Effective from, then select Add. Only a rate that hasn't started yet can be deleted.
Archiving and reactivating
To remove someone who has left, choose Archive person from their row menu. They leave the team list and can no longer sign in; their time stays. To bring someone back, show Everyone and choose Reactivate person. A deactivated person can also be brought back from Settings → Roles: select View deactivated people, then Restore on their row.
Settings
Everyone can open Settings, and sees only the tabs their role can use. Everyone has Preferences and Billing. Project managers also manage Clients, Tasks and Expense categories, and can read Company, Roles and Positions & Rates. Admins and owners have every tab: Company, Clients, Tasks, Expense categories, Roles, Positions & Rates, Workers, Vendor hours, Payroll, Preferences, Integrations, API keys, AI, Billing and Import.
Company
Company identity holds your company name, address and phone, as printed on invoices and estimates. Under Logo, select Upload logo to add a PNG, JPEG, SVG or WebP up to 2 MB. It appears on invoice PDFs and emails.
Company tasks
Settings → Tasks is the list of tasks projects can use. Each task has a class (Work, PTO, Vacation, Sick or Holiday). Billable makes new project assignments of the task start billable. Default adds the task to new projects automatically. To add one, type its name in Add a task.... Select a name to rename it. To retire a task, point at its row and select the Archive button. View archived tasks lists retired tasks, and Restore brings one back.
Preferences
Settings → Preferences has these cards:
- Appearance: your own light or dark theme (on this device) and seasonal effects (on your account, on every device).
- Seasonal effects for everyone (owners and admins only): turn seasonal effects off for the whole company.
- Billing preferences: rounding. Choose No rounding, 6 min (0.1 h) or 15 min (0.25 h). Hours are rounded up on invoices and summary reports; timesheets keep exact time.
- Company preferences: the day the week starts, whether time shows as 7:30 or 7.5, the month your fiscal year starts, and the default weekly capacity.
- Modules: turn invoicing, expenses and estimates on or off.
- Workflow: Require timesheet approval. When it's on, invoices and the billing run leave out hours that haven't been approved yet. Expenses aren't affected. See Approvals.
- Workflow: Planned time off. When it's on, people plan time off on My hours and managers, admins and owners approve it. See Planned time off.
- Workflow: Require a note on every time entry. When it's on, saving an entry or starting a timer without a note is refused, in the web app, the desktop and phone apps, and through MCP. Stopping a timer and imported time are not affected.
- Invoicing: Invoices are created in QuickBooks. See If you invoice in QuickBooks.
- Invoice numbering: the Prefix and Next number, with a preview of the next invoice number.
- Invoice presentation: the default line detail for new invoices, whether invoices show the hours-by-staff summary, and the remittance instructions.
- Overdue payment reminders: how many days between reminders and the most to send. A maximum of 0 turns reminders off.
Remittance instructions
Remittance instructions tell clients how to pay you. They print under the invoice totals.
- Go to Settings → Preferences → Invoice presentation.
- Type your instructions in Remittance instructions, for example who to make checks payable to and where to send them.
- Select Save.
If you leave it blank, invoices show your company name and address there instead.
Positions and rates
Settings → Positions & Rates sets standard rates by position.
- Positions: add a position with Add a position…, and use the arrows, Rename and Archive to keep the list in order.
- Rate schedules: select New version, enter a Version label and the date it is Effective from, fill in the $/hr for each position, and select Save version. The current version is marked Live today.
Versions can't be changed after they're saved. To change rates, create a new version with a new effective date. Upload a rate list reads a rate list from a file for you to review; it needs an AI key (see the AI tab).
A person's own billable rate comes first. Their position's rate is used when they have none. Projects choose which schedule their worksheet invoices use under Rate policy.
Payroll
Settings → Payroll holds the pay frequency, time-off banks, the holiday schedule, time-off allowances and balances. Owners and admins can Adjust a person's balance by hours (up or down, from a date), Extend carryover, or Restore carryover that expired unused (never more than was forfeited). To correct the carryover amount itself, use Edit on the allowance instead. Saving or deleting an allowance asks for a reason too (a new one starts with "Initial setup", which you can change), and shows in the same history. The person sees each change to their allowance, and why, in the PTO history on their My hours page. Each needs a reason, and each is kept in that person's history with who made it and the balance before and after; a mistake is fixed with another adjustment.
Email the payroll report sends each pay period's payroll report by email once the period is over. It's off until you turn it on:
- Tick On.
- Set Send this many days after the pay period ends (1 to 14) and the time of day, in your company's time zone.
- Tick who gets it. Only active admins and owners who can sign in are offered.
- Select Save. The card then says when the next email goes, and for which pay period.
Each email has the Reports → Payroll table itself: a row for each person with the tab's badges, their hours on each day of the period (time off marked, such as "6 PTO"), then regular, overtime, 1099, holiday, time off, total and expenses, and the totals row. It counts every hour, approved or not. On a narrow screen the table scrolls sideways. The attached PDF prints the same table on a landscape page. It also carries that report's warnings, such as who has hours not approved yet, and a link to the report in Totalizr. Attached: the hours for ADP (a CSV with the Reports → Payroll columns), a PDF to print, and an expense report for each person with approved expenses in the period, laid out like the paper form with the receipts after it. A HEIC photo receipt comes as a file of its own. If the receipts would make the email too big, some are left out and the email says whose.
Send a test to me now sends the report to you alone, with "TEST:" in the subject. Choose which period it covers: Last completed period (what the schedule sends, and the default), Current period so far, or Another period, stepping back with the arrows. A period still being worked says "in progress, as of" the time it was sent. The card says which period the test covers, and which period an expense approved today belongs to: expenses are owed in the period they're approved in, so ones you approve today aren't in the last completed period's email. A test isn't counted as any period's email. Recent sends lists each email, who it went to, and whether it was Sent, Failed or Skipped. If email isn't set up on the server, the card says so: every send would fail.
Integrations
Settings → Integrations connects other services:
- QuickBooks Online: see QuickBooks.
- Google Calendar: time off (owners and admins): puts approved time off on a Google calendar shared with the team. See Google Calendar for time off.
- Harvest: connect with Connect to Harvest (or a personal access token) to import from Harvest. Once connected, you can tick Mirror Totalizr entries to Harvest, and select Sync now to sync right away.
Other settings tabs
- Clients and Expense categories: see Clients and Expense categories.
- Roles: what each role can do, and each person's role.
- Workers: vendor firms, and how each person works for the company (employee, subcontractor or a vendor firm's worker) and whether they're on the pay run, with dated history.
- Vendor hours: share hours with another firm that uses Totalizr, or receive theirs, using an invite code. Nothing moves until both firms agree. One rate crosses: on hours shared for a client, the firm receiving them gets the sharing firm's billing rate on each billable hour as its cost (the rate the sharing firm's invoices to that client show), seen by its admins and owners. No other rate, and no cost rate, crosses. Through the API and MCP, each copy also carries the Harvest id of the sharing firm's hour, when it has one, so the two firms' records can be matched. Hours you receive land by themselves every night after the Harvest sync, and every hour for this month and last. Land hours now brings them in at once, and the line under it says when the last landing ran and what it did.
- Payroll: see Payroll.
- API keys: keys that let another system work with your company's data. Choose what each key may do; a key with nothing ticked has full access. The key is shown only once, so copy it straight away. Revoke turns a key off.
- AI: your company's Anthropic API key, used to read uploaded rate lists and staff rosters.
- Billing: your subscription, seats and renewal date. Owners and admins can subscribe or manage the subscription.
- Import: import data from Harvest, or time from QuickBooks, and see the import history. The QuickBooks card also has Sync now; see QuickBooks time sync.
The desktop app
The desktop app puts your timer in the Mac menu bar or the Windows system tray, and keeps running when your browser is closed.
Installing the desktop app
Get it from the download page:
- Mac: Apple silicon (M1 or later). Drag Totalizr into your Applications folder before you open it the first time, or it can't update itself. Intel Macs aren't supported yet.
- Windows: Windows 10 or 11, 64-bit. Run the installer, then open Totalizr from the Start menu.
Then sign in. With email and password, you sign in inside the app. With Google sign-in, the app opens your web browser: sign in there, and when the page says you're signed in, close the tab. If your browser asks to open Totalizr, allow it. The app then finishes signing in.
The tray icon and its menu
On a Mac, the menu bar shows --:-- when no timer is running, and the running time while one is. Point at the icon to see the project. On Windows, the icon can't show the time, so use its menu.
Click the icon to open or close the timer window. Right-click it for the menu:
- Start timer… opens the timer window, so you can pick what to time. While a timer runs, this item shows Stop and the time; select it to stop the timer.
- The running project, or "No timer running".
- Check for updates…
- Open Totalizr opens the main window.
- Quit Totalizr closes the app.
The timer window
The timer window, sometimes called the popover, shows today's entries and total, with a strip of daily totals for the week.
- To start a timer, select New Entry, pick a project and task, add a note (required if your company requires notes), and select Start. To log time instead, type it and select Save.
- To continue one of today's entries, select its start button. Select stop to stop it.
- Select an entry to change it, or to delete it.
- A rejected entry shows "Rejected:" and the reviewer's reason under its project.
- Open App opens the main window. ? opens this help in your browser. The gear menu has Open Totalizr, Preferences... (Settings in the main window) and Quit Totalizr.
On a Mac, the timer window drops down from the menu bar, stays above other windows, and hides when you click somewhere else. On Windows, it's a normal window called Totalizr Timer that you can move and resize. It opens where you last left it, and closing it only hides it.
Pop out timer, keep on top and shortcut
These controls are in the main window, above your profile at the bottom of the left menu, or next to the timer in the top menu. They appear in desktop app 0.4.30 and later.
- Pop out timer opens the timer window, the same as clicking the tray icon.
- Keep timer on top (Windows only) keeps the timer window above your other windows. It is off until you tick it. On a Mac the timer window always stays on top.
- Shortcut lets you open the timer window from anywhere with a key combination. It is off until you set one.
To set a shortcut:
- Next to Shortcut, select Set.
- Press the keys you want: Ctrl, Alt, Shift or the Windows key, plus one other key, for example Ctrl+Shift+T. Press Escape to cancel.
To turn the shortcut off, select Clear. If Totalizr says it couldn't register the shortcut, another app may already use it; choose a different one.
Closing, quitting and starting at login
Closing the main window doesn't quit Totalizr: on a Mac the window hides, and on Windows it minimizes. Your timer keeps running. To bring the window back, use Open Totalizr. To stop the app, use Quit Totalizr.
Totalizr adds itself to the apps that start when you sign in to your computer. If you remove it from your computer's login items, it won't add itself again.
On a Mac, the View menu zooms the main window in and out.
Updates
The desktop app checks for updates shortly after it starts. From version 0.4.32 it checks again every hour, and when you reload a page (at most every couple of minutes); earlier versions check every 6 hours. When one is ready, it asks you to Install now or Later. Later waits a day before asking about that version again. The app closes briefly while it installs.
When an update is waiting, a round download button appears next to your profile at the bottom of the left menu; select it to install the update and restart.
To check yourself, open your profile menu and choose Check for updates. It says you're up to date (with the version you have), shows the new version with an Install and restart button, or says why it couldn't check. An app from before version 0.4.32 doesn't have this: choose Check for updates… from the tray icon's menu instead. On Windows the tray icon may be hidden under ^ by the clock.
If something looks wrong
Try these first:
- Reload the page. In the desktop app, use Open Totalizr, or quit and open it again.
- Check the company. If you belong to more than one, the company name is under the Totalizr logo. Projects and time in another company don't show here.
- Check the dates and filters. Approvals and reports start on this week, and the billing run on last month. On Approvals, View all dates shows work waiting outside the period.
- Time you can't change is usually locked because it's on an invoice, or was billed in or imported from QuickBooks. See Locked and billed time.
- Hours missing from an invoice or billing run may not be approved yet, if your company requires timesheet approval. See Approvals.
- A page or amount you can't see may need a different role. See Roles.
- An invoice email that didn't arrive: open the invoice and check Latest activity at the top.
- "Read-only — license expired": your company's subscription needs renewing. Ask an owner or admin.
Sign-in problems
- Forgotten password: use Forgot password? on the sign-in page. The link lasts 1 hour.
- Expired invite: invites last 7 days. Ask your admin to send a new one.
- "No Totalizr account matches that email" with Google sign-in: your admin needs to invite that exact email address.
Getting help
Ask your Totalizr admin first. They can check your role, your projects and your company's settings. When you report a problem, include:
- what you were doing, and on which page;
- the date and time it happened;
- any message Totalizr showed, word for word;
- the version number, shown under your name at the bottom of the left menu (and in the tray menu of the desktop app).